Mastery of the iPod Starts Here
Posts tagged Unlock
Unlock iPhone 3G and3GS – BlackSn0w
Nov 13th
If you have not already jailbroken it will be easier to follow one of these tutorials which will walk you through both jailbreaking and unlocking.
- Windows
- Mac
Lets begin…

Watch the Video!
For your convenience this tutorial is available in video format also. Click the Watch It button to view the tutorial!
Step One
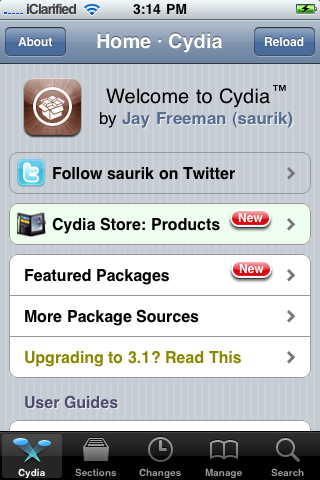
Press to launch Cydia from your iPhone Springboard.
Step Two
Press to select Manage from the tabs at the bottom of the screen.
Step Three
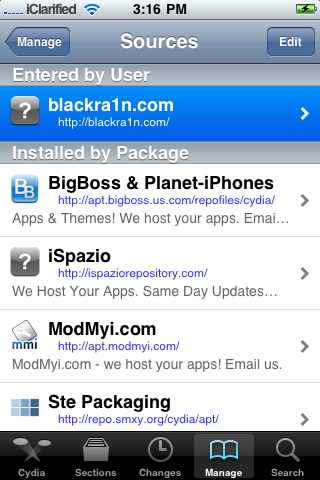
Press the large Sources button.

Step Four
Press the Edit button at the top right of the screen.

Step Five
Press the Add button at the top left of the screen.

Step Six
Input http://www.blackra1n.com as the source address then press the Add Source button. Once Cydia has added the source press the large Return to Cydia button.

Step Seven
Press the Done button at the top right of the screen.

Step Eight
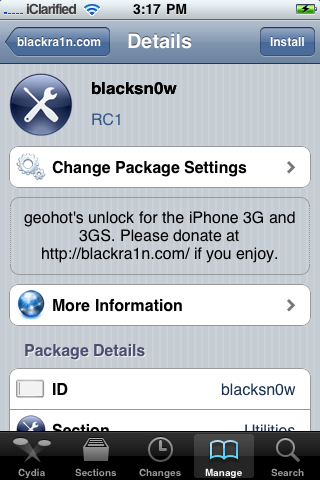
Press to select blackra1n.com from the list of sources.
Step Nine
Press to select blacksn0w from the list of packages.

Step Ten
Press the Install button at the top right of the screen.
Step Eleven
Press the Confirm button at the top right to begin installation.

Step Twelve
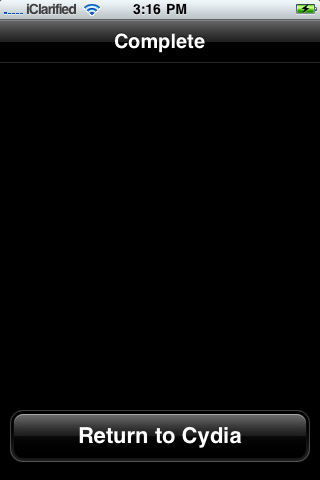
Once the unlock has been installed successfully press the large Return to Cydia button.
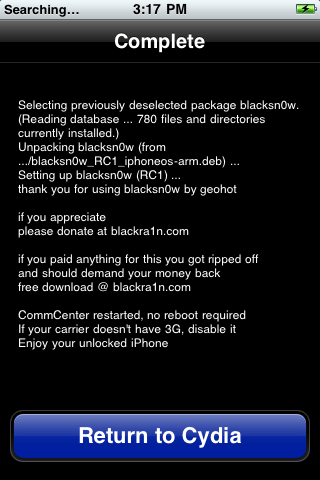
Step Thirteen
Wait a few minutes for your CommCenter to restart and you will now be able to use the SIM card of your choice on your unlocked iPhone!

***THANKS: Congratulations and thanks to Geohot for making this unlock possible. You can donate towards his efforts at www.blackra1n.com.
Unlock and Jailbreak 3.1 (iPhone 2G) Using PwnageTool – Mac
Sep 16th
This tutorial will show you how to jailbreak and unlock your 2G iPhone on the 3.1 iPhone firmware.
Unfortunately PwnageTool is not available for Windows yet.

Watch the Video!
For your convenience this tutorial is available in video format also. Click the Watch It button to view the tutorial!
Alright, first make a folder on the desktop. In it, you will need a couple of things. The two bootloader files:
- BL 3.9
- BL 4.6
You will also need the 3.1 iPhone firmware.
3.1.0 (2G): iPhone1,1_3.1_7C144_Restore.ipsw
When downloading the IPSW file, it is best to download it with Firefox!
Step One
Create a folder on your desktop with all the required files listed above.
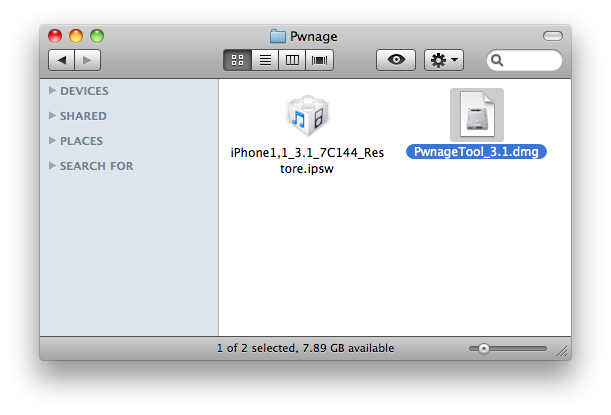
Step Two
Double click to mount the PwnageTool dmg.
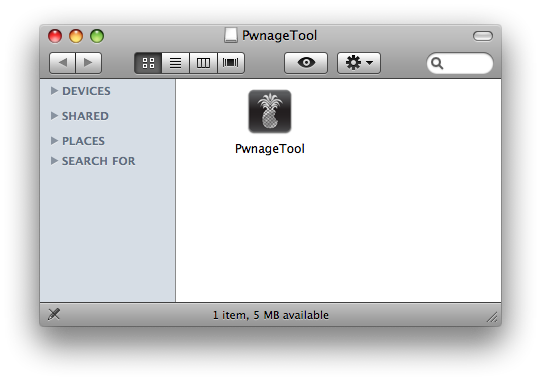
Drag the PwnageTool icon to the Pwnage folder then launch it.

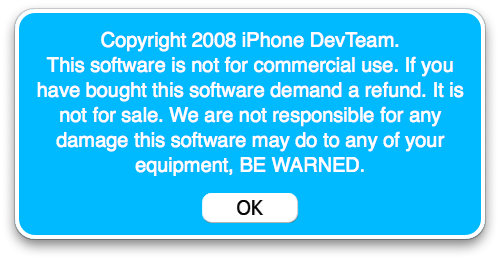
Click Ok if presented with a warning.
Step Three
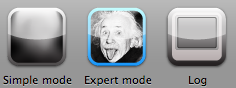
Make sure you click Expert Mode from the top menu.
Step Four
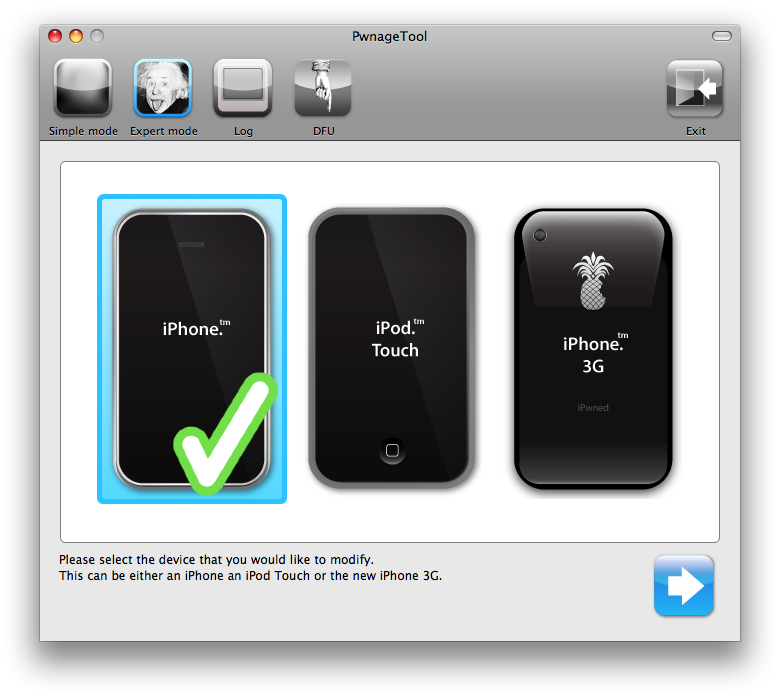
Select your iPhone or iPod from the three devices shown. Notice a large checkmark appears over the selected device. Then click the blue arrow button at the bottom right.
Step Five
You will be brought to the “Browse for IPSW” page. On my laptop, it automatically found the IPSW. If PwnageTool doesn’t automatically find the ipsw file you can click Browse for IPSW… button.
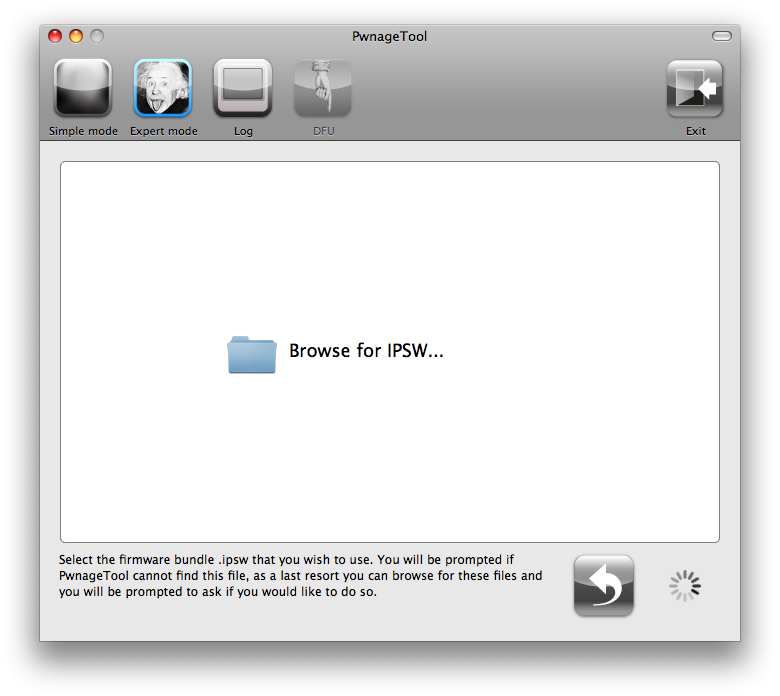
Click to select the found IPSW file, a checkmark will appear next to it. Then click the blue arrow button to continue.

Step Six
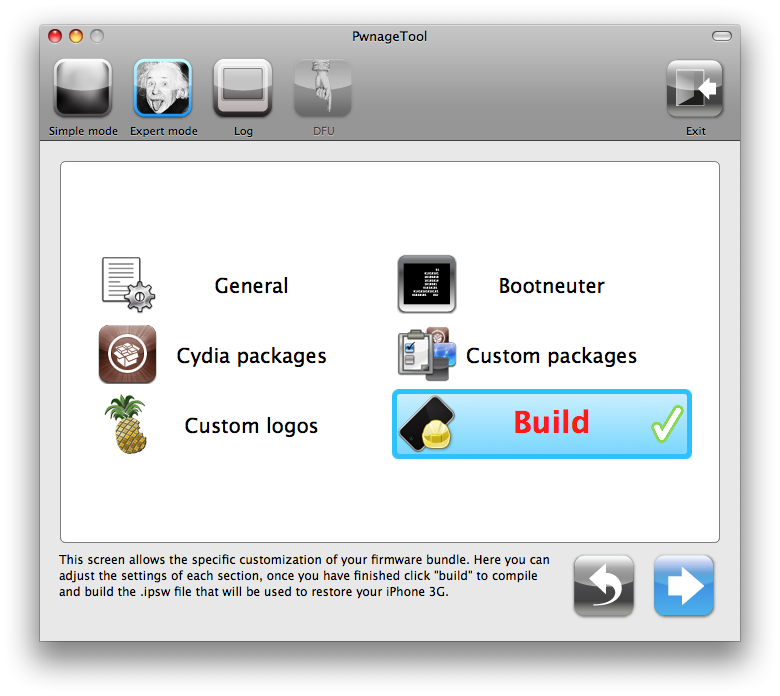
You will then be brought to a menu with 7 choices. Click to select General then click the blue arrow button.
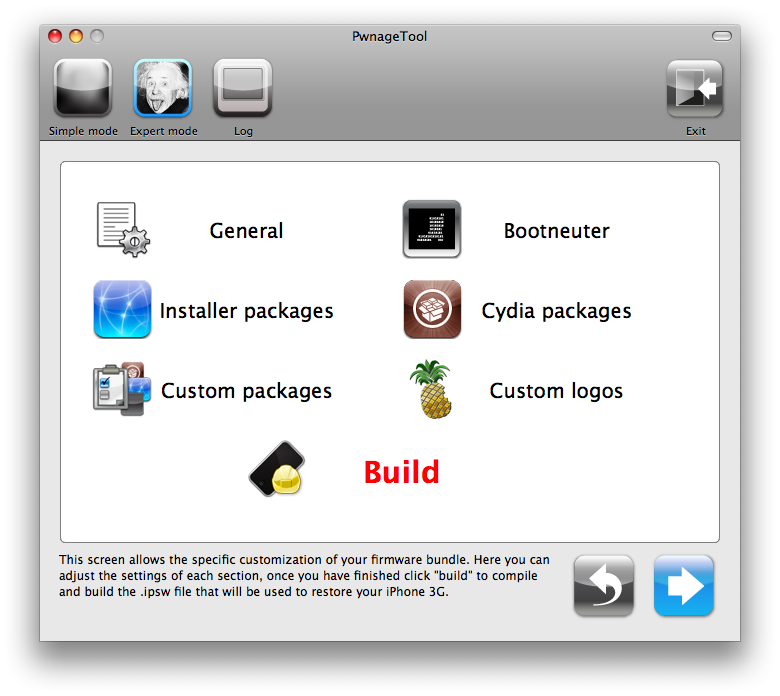
The General settings allows you to decide the partition size. Check Activate the phone and Enabled baseband update. Click the blue arrow button.
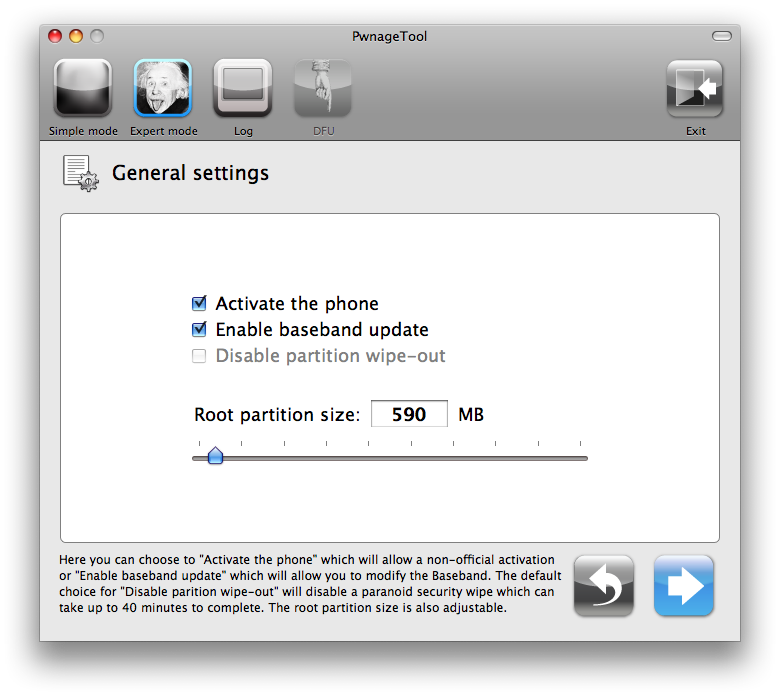
***If the Enable Baseband checkbox is not greyed out, checkmark it. This will allow the unlock to occur!***
***For the 3.0 firmware you may have to increase the size of your root partition slightly for the IPSW build to be successful. 590MB worked just fine for me***
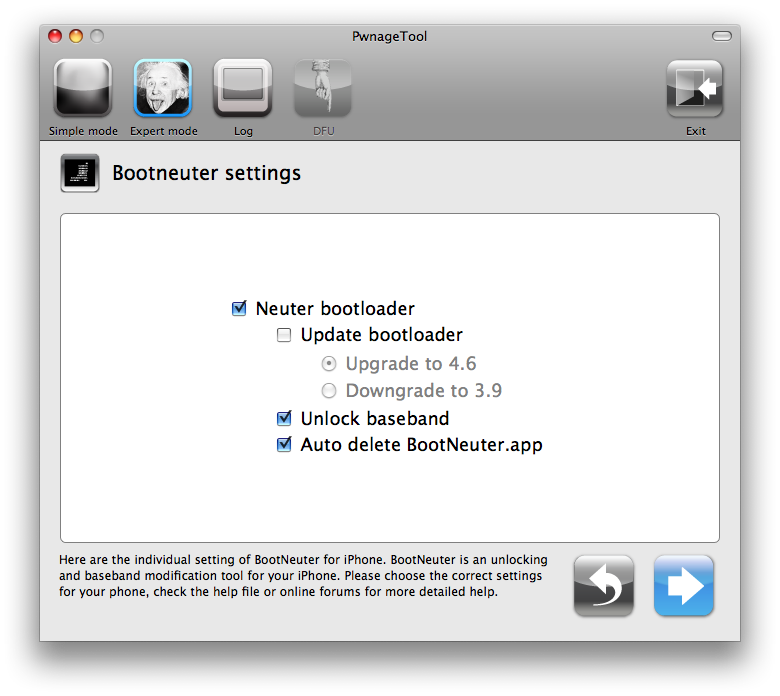
In the Bootneuter settings, click Neuter bootloader, Unlock baseband, and Auto-Delete BootNeuter.app. It is not necessary to upgrade the bootloader unless you are really feeling the need to be on 4.6. Click the blue arrow button to continue.
The Cydia settings menu allows you to create custom packages so you do not have to manually install the necessary them later.
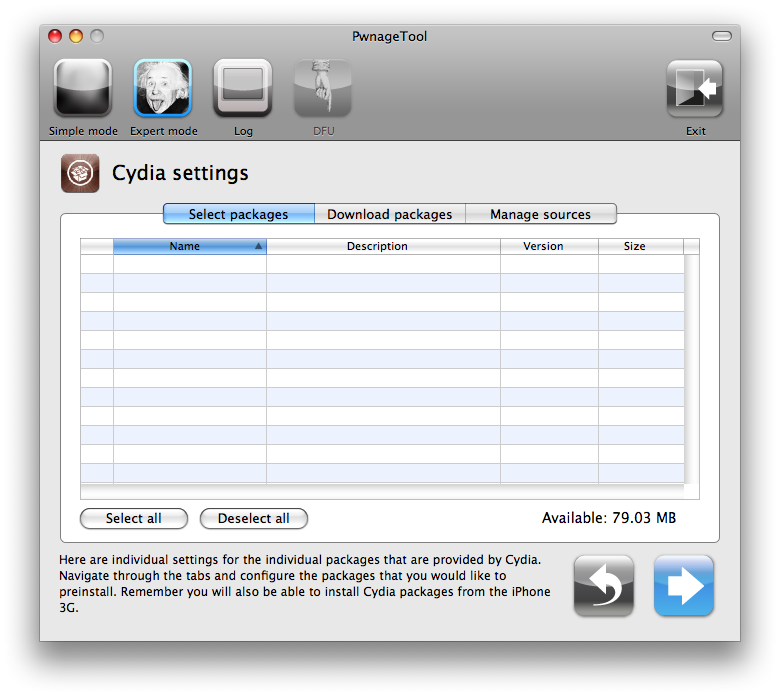
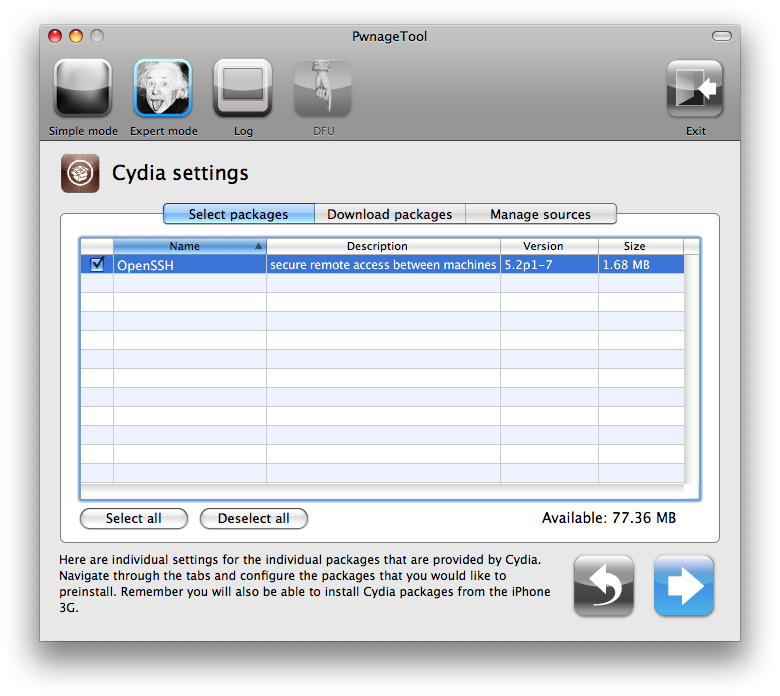
Click to select the Download packages tab. Then click the Refresh button to display all the available packages. Double clicking the package you want will download it and make it available in the Select Packages tab.
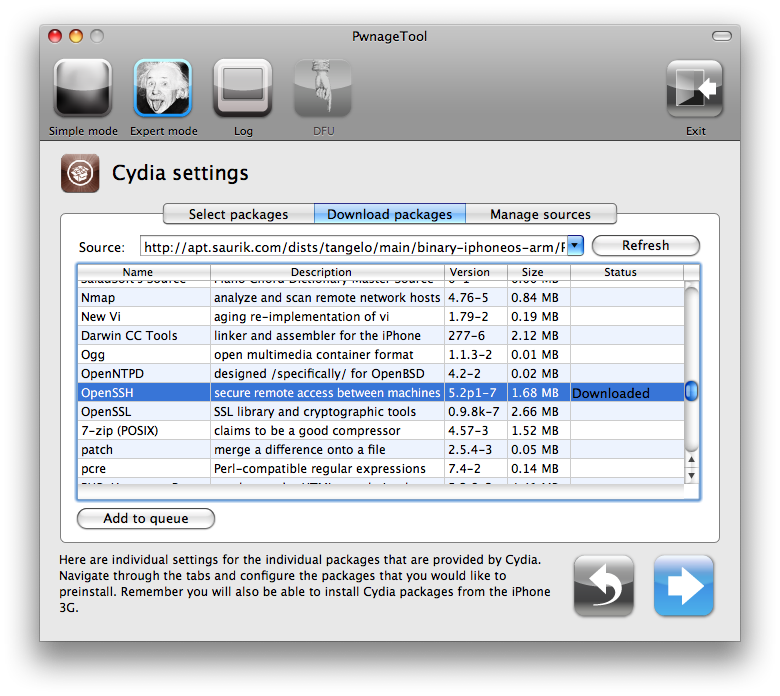
Checkmark the ones you want then Click the blue arrow button.
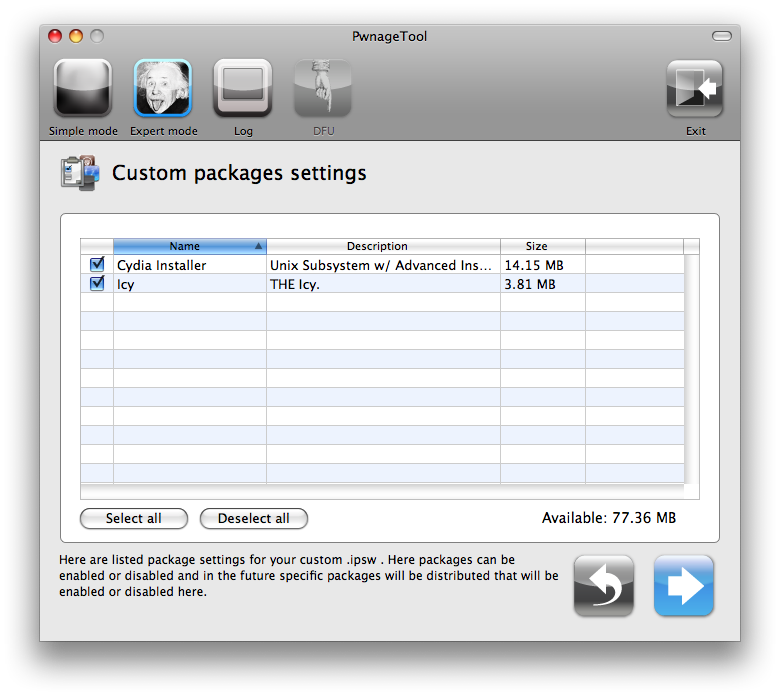
The Custom Packages Settings menu displays listed package settings for your custom IPSW. For know leave these settings as is. Click the blue arrow button to continue.
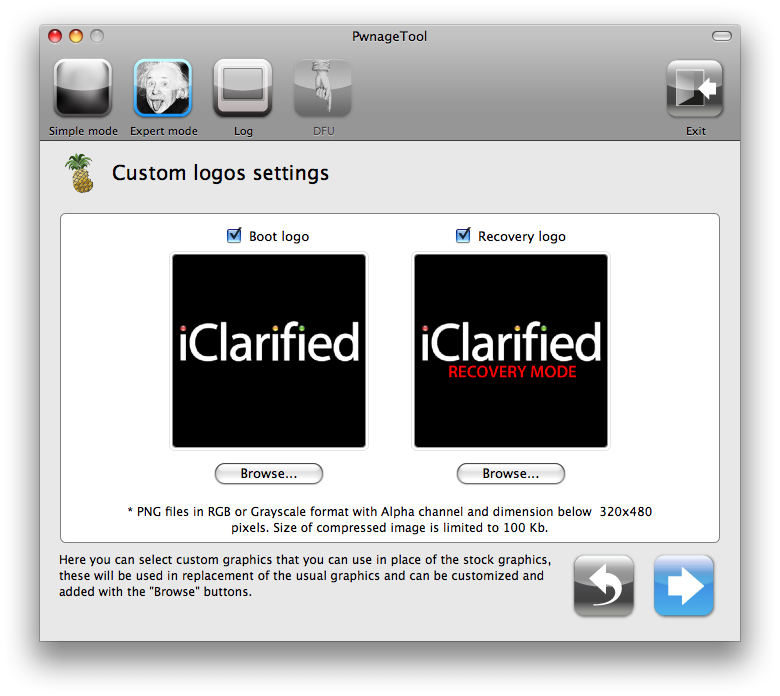
The Custom Logos Settings menu allows you to add your own images as boot logos. Click the Browse button to select your Boot logo and Recovery logo.
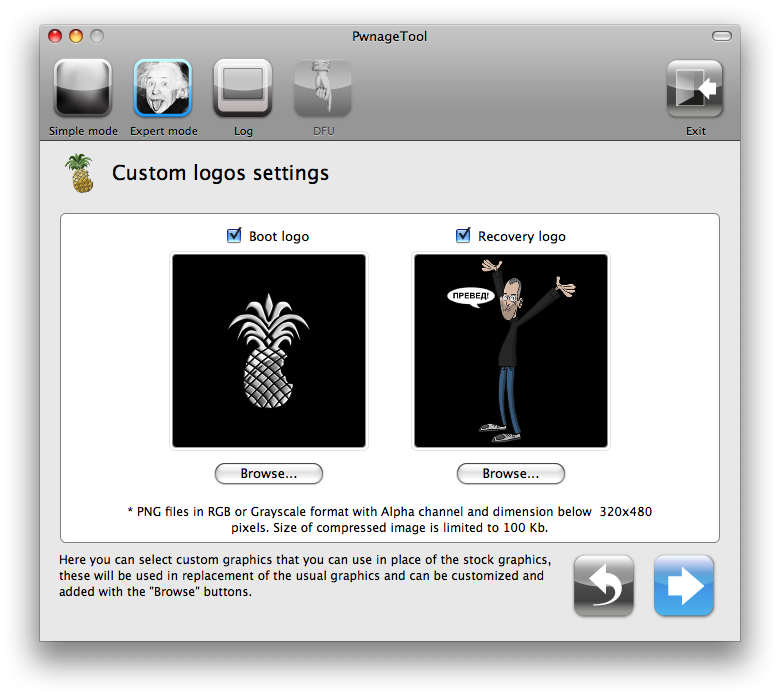
Remember the rules for them: RGB or Grayscale format with Alpha channel and dimension bellow 320×480. If you would like to use the iClarified ones they can be found here: Boot Logo, Recovery Logo
Click the blue arrow button to continue.
Step Seven
You are now ready to build your custom firmware. Click the build button to select it, then click the blue arrow button.
Step Eight
If this is the first time doing this, you will be asked to upload the 3.9 and 4.6 BL files. When prompted to search the web, click no.
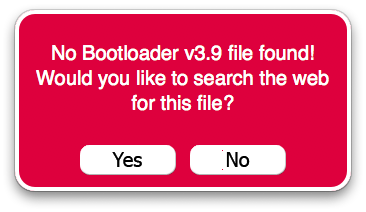
You will prompted to browse for the 3.9BL file. Click Yes then select the file(BL-39.bin) from the Pwnage folder you created on your desktop and click the Open button.
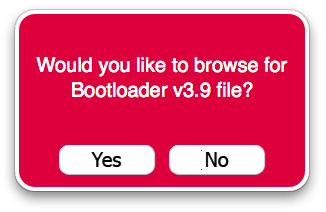
Select the file in the Pwnage folder on your desktop and click the Open button.
Do the same for 4.6.


***: After loading the 4.6 BL you may be asked if you’re a legit user. If you legally have ATT or an iPhone plan in a different country, clicking yes will not unlock the iPhone and activate it as your legal plan already activates it and there is no need for an unlock. However if you wish to keep the iPhone unlocked, when asked if you’re a legit iPhone user, click no
Step Nine
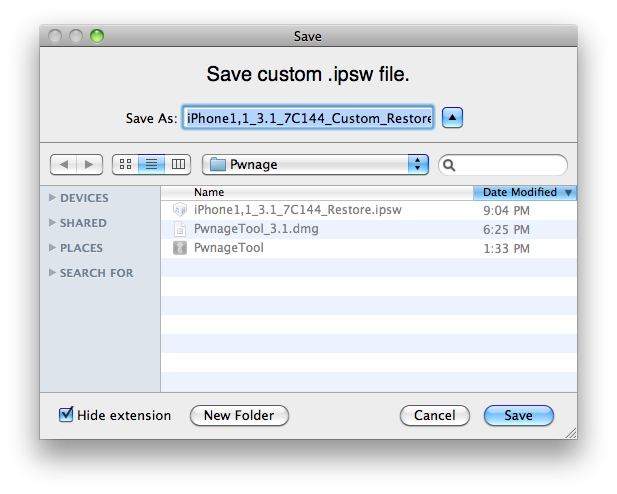
After both are found. You will be asked to save your custom .ipsw file. Save it to your Pwnage folder on the desktop.
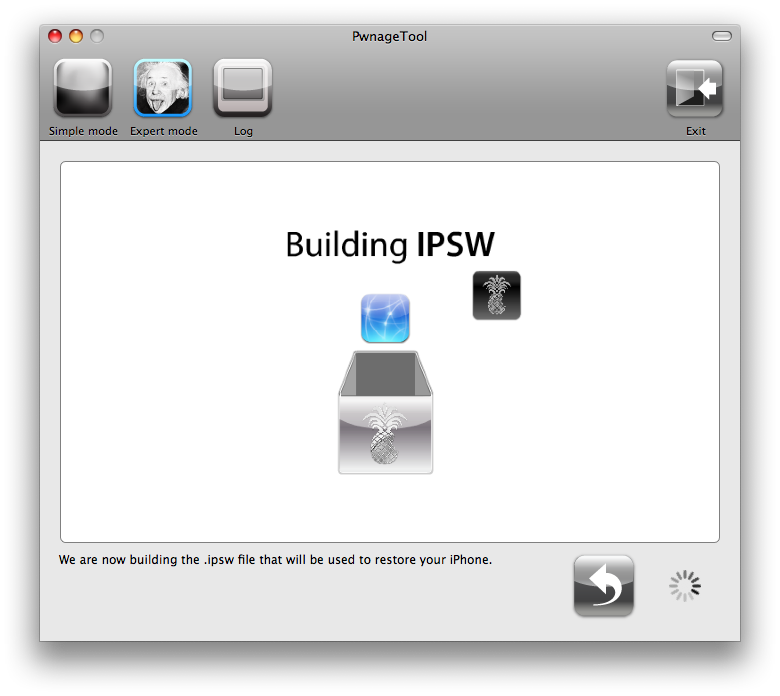
Step Ten
Your custom IPSW is now being built. Please allow up to 10 minutes.
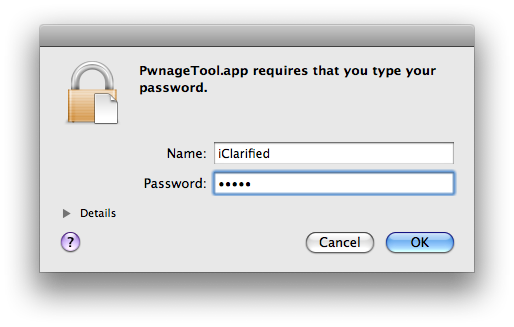
If prompted enter your Administrator password and click the OK button.
When prompted if your iPhone has been Pwned before, we clicked No. It allows for a more thorough restore.

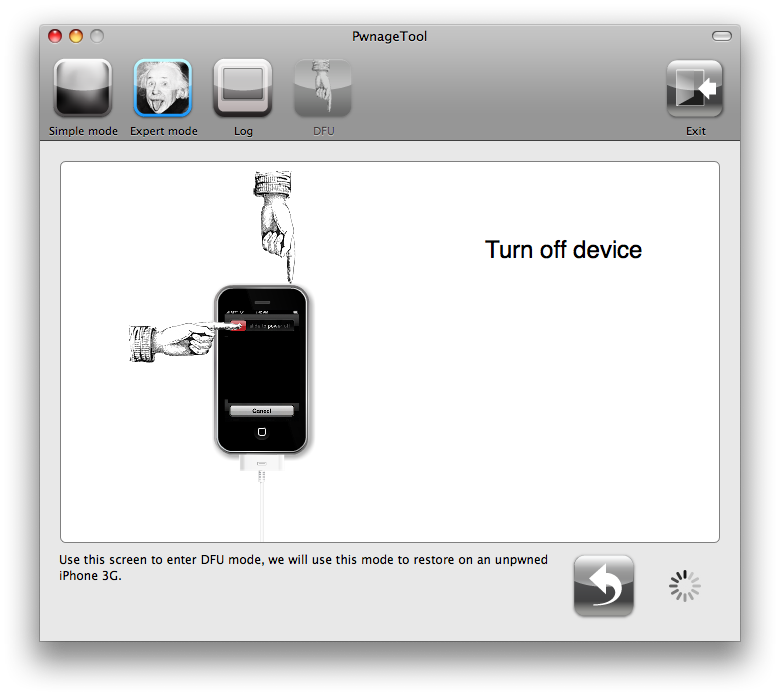
You will be asked to turn off the device. Make sure it is connected to the USB port.
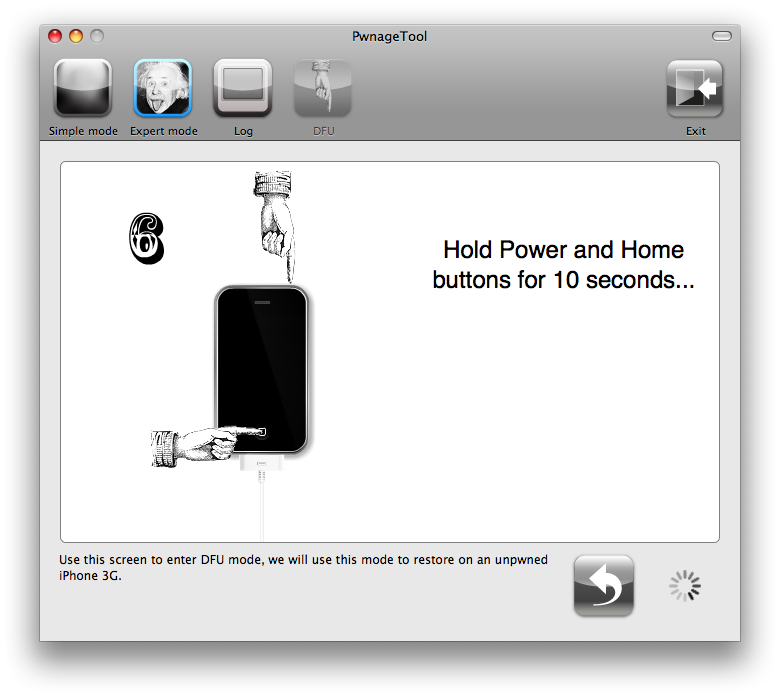
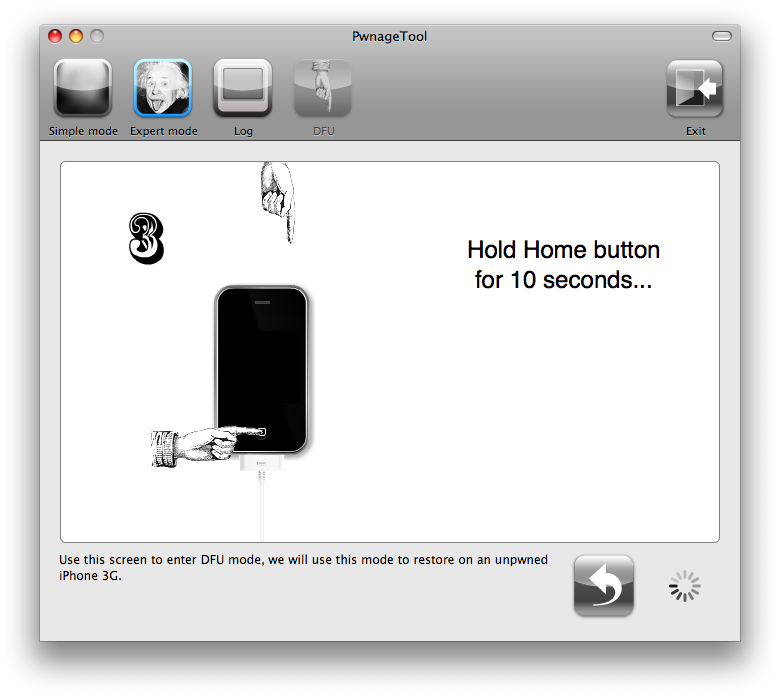
Step Eleven
Be ready to follow directions now. It will ask you to hold the home button and the power button for 10 seconds. Then, you will have to release the power button and hold the home button for 10 seconds to enter DFU.
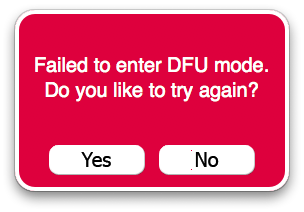
If you fail, it will show you a message. Click Yes. Unplug the iPhone from the USB. Turn it off, then turn it back on. Plug it back into the USB and turn off the iPhone when prompted.
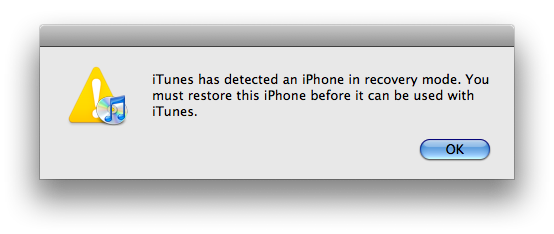
When done correctly, Pwnage 2.0 will display a message telling your that it successfully entered DFU mode. iTunes will also pop-up.

Step Twelve
In iTunes, hold the Alt/Option key and click Restore.
Step Thirteen
Navigate to the Pwnage folder on your desktop using the dialog window that appears. Select the custom IPSW that was created (iPhone1,1_3.1_7C144_Custom_Restore.ipsw) and click the Open button.

Step Fourteen
Once the restore has completed, it will restart your iPhone. The phone will then launch BootNeuter.app to unlock your device.
Please allow 5 minutes for this to complete. Your iPhone will restart once completed.
iPhone Dev-Team Updates UltraSn0w Unlock, Discusses PurpleSn0w
Jul 16th

—–
The day before yesterday, some fellow named geohot released a program called “purplesn0w” which claims to be a better unlock than our ultrasn0w solution. He was kind enough to provide source, which we naturally took apart to try to validate his claims. ![]() We’ve found he had come up with some pretty neat ideas, including patching the actual text of the baseband code by copying it over to RAM and then using the MMU and page tables to have the baseband pretend it is part of the original bootrom. Of course, like yellowsn0w and ultrasn0w, this code has to be reloaded with every reboot of the baseband. However, the advantage of this is that developing unlocking payloads is a lot simpler… in fact, geohot used the same payload in AnySim and BootNeuter. We kicked around this idea ourselves before, but eventually found a work-around for the same problem with the yellowsn0w/ultrasn0w payload. The two pieces of code have the exact same effect on the baseband… with the difference that geohot’s exploit overwrites an arbitrary block of memory one megabyte in size. The baseband has a total of eight megabytes of memory and every bit of it is earmarked for use (except for 485212 bytes of it which we haven’t accounted for yet, but that’s still less than 1 MB). This means that eventually the area of memory geohot is using will be corrupted and 1 MB of baseband code will be corrupted (until the next reboot). How soon will this happen? Will it even matter in day-to-day use? We don’t know, because we haven’t spent much time looking. However, why take the risk when the yellowsn0w/ultrasn0w payload accomplishes the same job with no corruption?
We’ve found he had come up with some pretty neat ideas, including patching the actual text of the baseband code by copying it over to RAM and then using the MMU and page tables to have the baseband pretend it is part of the original bootrom. Of course, like yellowsn0w and ultrasn0w, this code has to be reloaded with every reboot of the baseband. However, the advantage of this is that developing unlocking payloads is a lot simpler… in fact, geohot used the same payload in AnySim and BootNeuter. We kicked around this idea ourselves before, but eventually found a work-around for the same problem with the yellowsn0w/ultrasn0w payload. The two pieces of code have the exact same effect on the baseband… with the difference that geohot’s exploit overwrites an arbitrary block of memory one megabyte in size. The baseband has a total of eight megabytes of memory and every bit of it is earmarked for use (except for 485212 bytes of it which we haven’t accounted for yet, but that’s still less than 1 MB). This means that eventually the area of memory geohot is using will be corrupted and 1 MB of baseband code will be corrupted (until the next reboot). How soon will this happen? Will it even matter in day-to-day use? We don’t know, because we haven’t spent much time looking. However, why take the risk when the yellowsn0w/ultrasn0w payload accomplishes the same job with no corruption?
The second new idea he had was to patch CommCenter rather than use a daemon. At first, this idea seemed pretty distasteful to us. Binary patches are messy and difficult to maintain (we figure it’s partly why he only made a version for 3G S and not 3G as well). In addition, the stated reason of reduced battery life with a daemon is factually incorrect, since any computer science student who’s taken a course in operating systems will tell you that a sleeping task takes up exactly NO CPU resources and NO power (it’s merely skipped over during context switches). That’s right: not “only a little” power, but absolutely NO power. However, ultrasn0w 0.6 did have a problem where the STK refresh command it used crashed the baseband in 3G S. This caused the baseband to continually come up and then restart. That DOES take power and so may explain the issues that people have been seeing. ultrasn0w 0.8 was supposed to have fixed this issue, but perhaps not completely. This is because the STK refreshes we used are inherently unreliable… but we thought they were necessary to avoid people having to reinsert their SIM. Turns out we were wrong on that score. geohot’s method shows that we can perform the unlock before CommCenter polls for lock state. When we do it before (instead of after), the STK refreshs are no longer necessary! The only way to do it before the polling, however, is to modify CommCenter. We’ve tried to make the best of a bad situation by using MobileSubstrate to perform the modification. This lets us modify the behavior of CommCenter without touching the actual binary. We also used a method to dynamically locate the patch location so that it should work on both 3G and 3G S (and should need to be updated less frequently). We also do it in a different way so that hactivated phones will work with the unlock (unlike purplesn0w). You’ll find that this update is now available through Cydia as ultrasn0w 0.9 We thank geohot for contributing to the scene once again. We don’t think purplesn0w is the right path, but it has certainly helped us improve ultrasn0w!
P.S. geohot, seriously, stop dicking around and look at the bootrom instead kthx. =P
—–
You can find instructions on how to unlock your iPhone using UltraSn0w here.
GeoHot Announces RC2 of His PurpleSn0w Unlock
Jul 16th

GeoHot has announced PurpleSn0w RC2, the second release of his unlock for the iPhone 3GS.
Improvements:
- 3G(the network speed) issues fixed…i’m pretty sure
- Now only patches one file, CommCenter
- Leaves no traces on your baseband after it runs. Seriously
- Much more clean and reliable.
You find instructions on how to unlock your iPhone 3GS using PurpleSn0w here. Remember you must have an officially activated iPhone to perform this unlock. (ie no support for hacktivated devices).

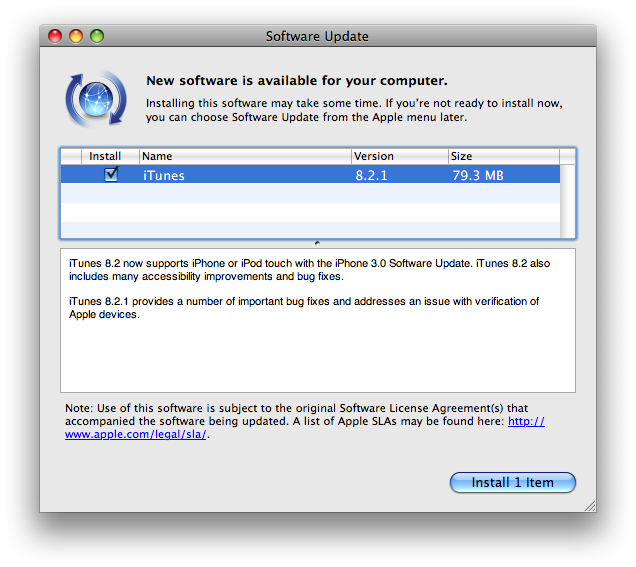
Apple Releases iTunes 8.2.1, Breaks Palm Pre Sync
Jul 16th

Apple has released iTunes 8.2.1 via Software Update and it reportedly breaks syncing with the Palm Pre.
iTunes 8.2 now supports iPhone or iPod touch with the iPhone 3.0 Software Update. iTunes 8.2 also includes many accessibility improvements and bug fixes.
iTunes 8.2.1 provides a number of important bug fixes and addresses an issue with verification of Apple devices.
The wording here clearly hints at the blocking of non Apple devices. A post at PreCentral [via MacRumors] seems to confirm this…
At least on this Mac, iTunes sync isn’t working after the 8.2.1 update. We were wondering if this day would come after the back and forth between Apple and Palm on the issue. It’s as-yet unclear exactly what method Apple is using to block Pre sync, but we suspect is wasn’t easy. …Which means we also suspect it might not be easy for Palm to turn it back on.
As usual we recommend iPhone users wait a bit before updating to confirm that there are no adverse affects for jailbreaking and unlocking.


Recent Comments