Mastery of the iPod Starts Here
Archive for September, 2009
How to Setup Google Sync for iPhone Calendars, Contacts, and Push Gmail
Sep 27th
These are instructions on how to setup your iPhone for Google Sync of Contacts, Calendars, and Push Gmail.
Please note Google Sync is only supported on iPhone OS 3.0 and above.
Step One
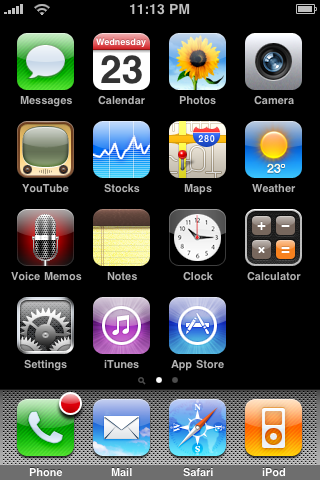
Press to select Settings from your Springboard.
Step Two
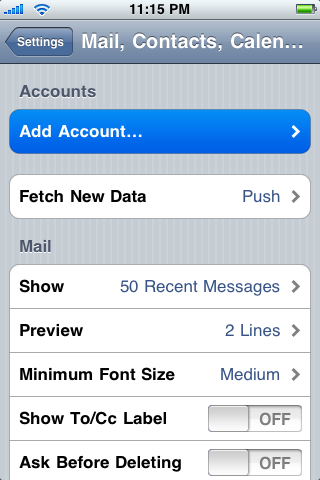
Press to choose Mail, Contacts, Calendars from the Settings Menu.

Step Three
Tap to select Add Account…
Step Four
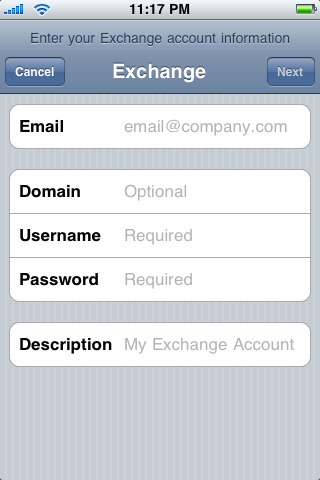
Select Microsoft Exchange from the list of account types.

Step Five
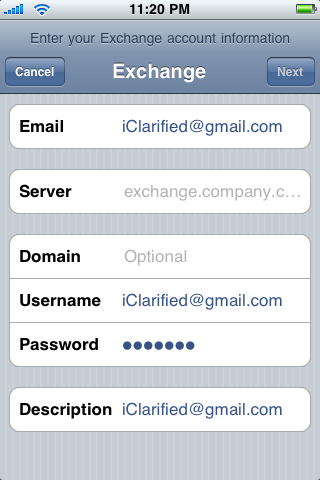
Enter your account details… Input your complete Gmail address in the Email field. Leave the Domain field blank. Enter your full Gmail address in the Username field. Input your Gmail password in the Password field. Once you have filled in all the fields you can press the Next button at the top right of the screen.

Step Six
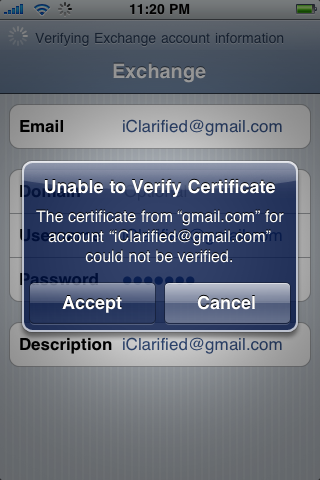
If you receive an Unable to Verify Certificate dialog press the Accept button.
Step Seven
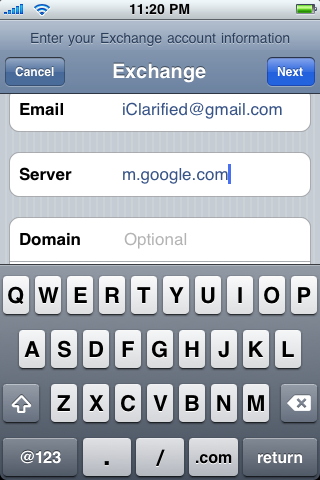
A new field called Server will appear. Enter m.google.com into this field then tap the Next button at the top right of your screen.
Step Eight
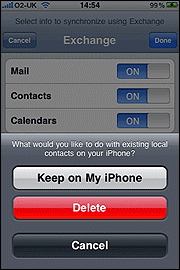
You can now choose which Google services you would like to sync. Set the switches then press the Donebutton at the top right of the screen.

You may be asked what to do with the with existing local contacts on your iPhone. If you want to sync only the My Contacts group, you must choose to Delete Existing Contacts during the Google Sync install when prompted. If you choose to keep existing contacts, it will sync the contents of the “All Contacts” group instead.
Step Nine
Congratulations, you have successfully setup Google Sync for your iPhone. Synchronization will begin automatically if you have Push enabled on your phone. You can also open the Mail, Calendar or Contacts app and wait a few seconds to start a sync.

Apologies to iPod Touch Weblog
Sep 18th
Such posts include: http://www.ipodtouchmaster.com/9-best-winterboard-themes-ever/ http://www.ipodtouchmaster.com/create-industrial-strength-passwords-with-secret-word/ http://www.ipodtouchmaster.com/create-an-iphoneipod-touch-dock-made-from-paper/ http://www.ipodtouchmaster.com/greenpois0n-to-jailbreak-3g-touch/ http://www.ipodtouchmaster.com/is-apple-planning-for-a-different-release-ipod-touch-3rd-generation-three-facts-that-say-yes/ http://www.ipodtouchmaster.com/is-apple-planning-for-a-re-release-of-ipod-touch-3rd-generation/ http://www.ipodtouchmaster.com/i-am-t-pain-one-hit-wonder/ http://www.ipodtouchmaster.com/3rd-gen-touch-already-torn-apart/ http://www.ipodtouchmaster.com/steve-jobs-explains-no-camera-in-ipod-touch/ http://www.ipodtouchmaster.com/appbox-pro/ http://www.ipodtouchmaster.com/rock-and-roll-event-roundpp/ http://www.ipodtouchmaster.com/where-to-watch-rock-and-roll-event/ http://www.ipodtouchmaster.com/best-buy-confirms-rumors-about-new-3rd-gen-touch/ http://www.ipodtouchmaster.com/wallpapers-miscellaneous/ http://www.ipodtouchmaster.com/wallpapers-abstract/ http://www.ipodtouchmaster.com/wallpapers-nature/ http://www.ipodtouchmaster.com/modern-combat-sandstorm-review-and-demo/ http://www.ipodtouchmaster.com/ipod-touch-cases-revealed/ http://www.ipodtouchmaster.com/modern-combat-sandstorm-released/ http://www.ipodtouchmaster.com/apple-holding-rock-and-roll-event-09-09-09/ http://www.ipodtouchmaster.com/apple-holding-rock-and-roll-event-september-9-2009/ http://www.ipodtouchmaster.com/cydia-sources/ http://www.ipodtouchmaster.com/facebook-3-0-out/ http://www.ipodtouchmaster.com/new-modern-combat-sandstorm-videos-and-pictures/ http://www.ipodtouchmaster.com/chage-home-screen-easily/ http://www.ipodtouchmaster.com/top-50-paid-apps-week-of-aug-22/ http://www.ipodtouchmaster.com/ipod-touch-lingo/ http://www.ipodtouchmaster.com/spyware-on-appstore/ http://www.ipodtouchmaster.com/iphone-3gs-shot-with-9mm-and-burned/ http://www.ipodtouchmaster.com/ipod-touch-3rd-gen-video-found/ http://www.ipodtouchmaster.com/updateamazing-games-coming-to-an-iphone-near-you/ http://www.ipodtouchmaster.com/ipod-touch-3rd-generation-concepts/ http://www.ipodtouchmaster.com/nfl-2010-released/ http://www.ipodtouchmaster.com/3-alternatives-to-tysiphonehelp-movie-downloads/ http://www.ipodtouchmaster.com/worms-to-be-updated/ http://www.ipodtouchmaster.com/the-app-store-turns-1/ All content from The iPod Touch Weblog has been removed. Sincere apologies from iPodTouchMaster.com
Webmaster News: iPodTouchMaster Cydia Repo NOW LIVE!!
Sep 16th
So what’s next here at iPodTouchMaster.com? Get ready for your own personal presence with a login account that will give you Member Access to the site. What do members get? You’ll have to wait to find out. Stay Tuned!
Unlock and Jailbreak 3.1 (iPhone 2G) Using PwnageTool – Mac
Sep 16th
This tutorial will show you how to jailbreak and unlock your 2G iPhone on the 3.1 iPhone firmware.
Unfortunately PwnageTool is not available for Windows yet.

Watch the Video!
For your convenience this tutorial is available in video format also. Click the Watch It button to view the tutorial!
Alright, first make a folder on the desktop. In it, you will need a couple of things. The two bootloader files:
- BL 3.9
- BL 4.6
You will also need the 3.1 iPhone firmware.
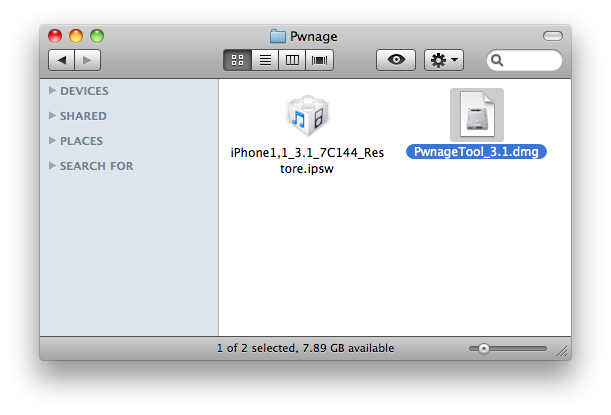
3.1.0 (2G): iPhone1,1_3.1_7C144_Restore.ipsw
When downloading the IPSW file, it is best to download it with Firefox!
Step One
Create a folder on your desktop with all the required files listed above.
Step Two
Double click to mount the PwnageTool dmg.
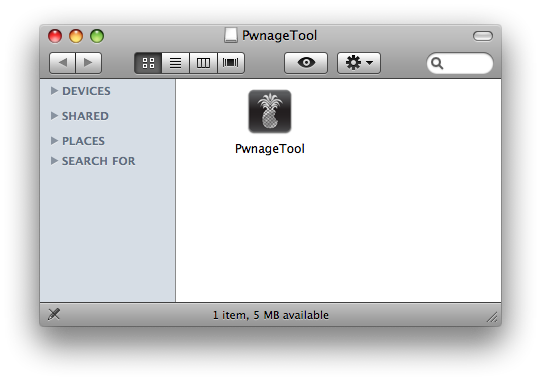
Drag the PwnageTool icon to the Pwnage folder then launch it.

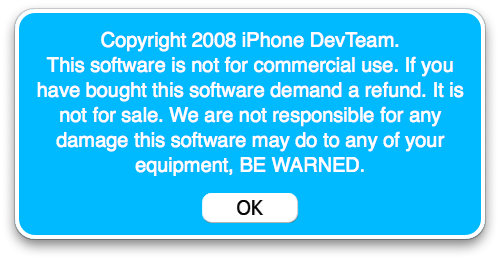
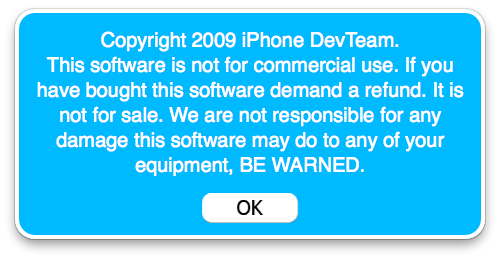
Click Ok if presented with a warning.
Step Three
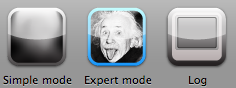
Make sure you click Expert Mode from the top menu.
Step Four
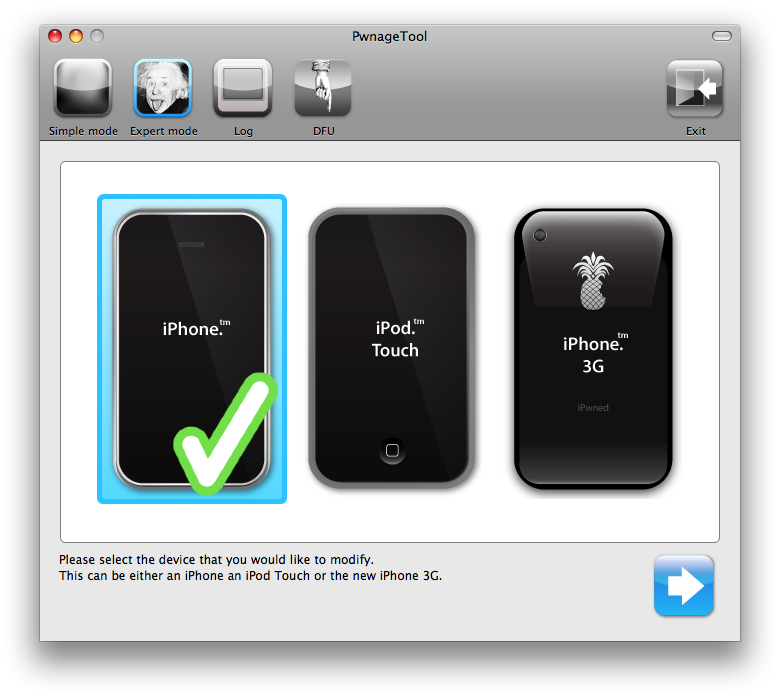
Select your iPhone or iPod from the three devices shown. Notice a large checkmark appears over the selected device. Then click the blue arrow button at the bottom right.
Step Five
You will be brought to the “Browse for IPSW” page. On my laptop, it automatically found the IPSW. If PwnageTool doesn’t automatically find the ipsw file you can click Browse for IPSW… button.
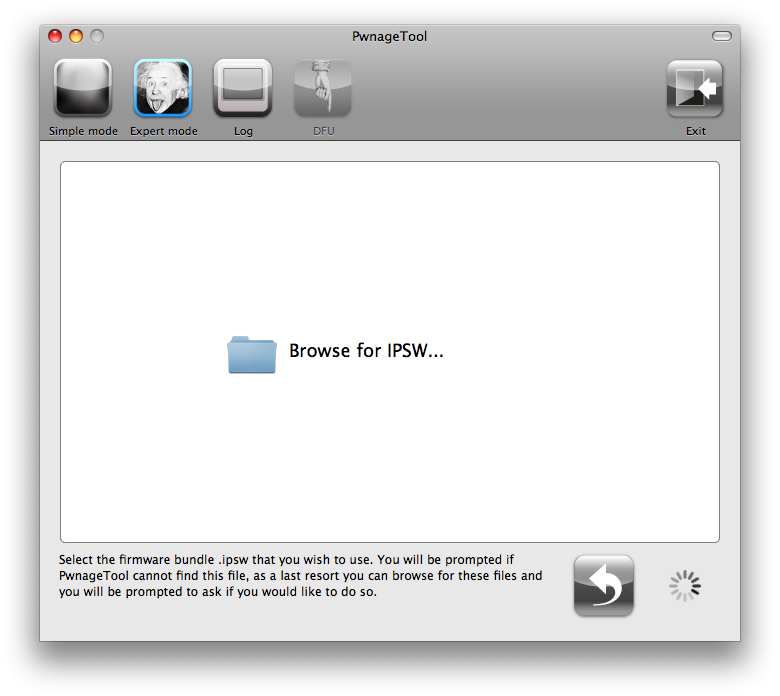
Click to select the found IPSW file, a checkmark will appear next to it. Then click the blue arrow button to continue.

Step Six
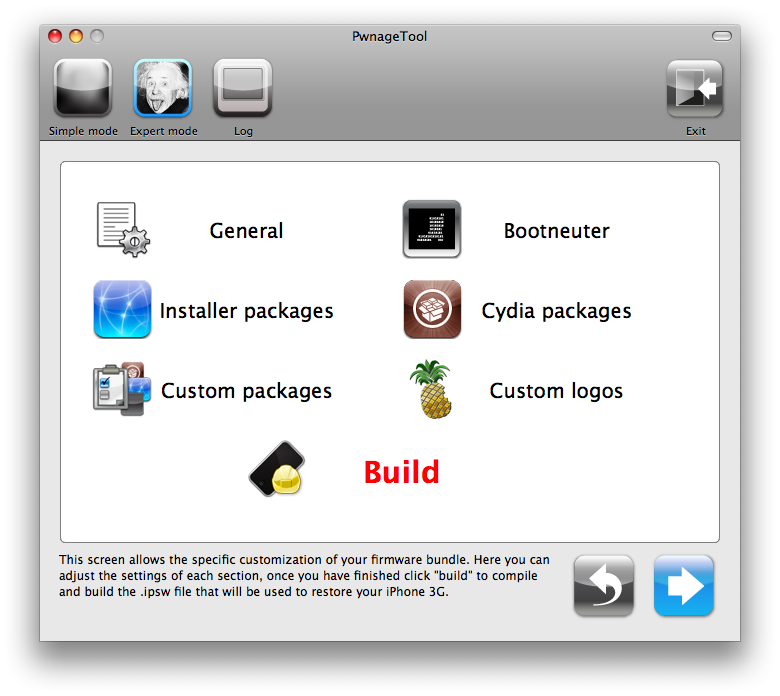
You will then be brought to a menu with 7 choices. Click to select General then click the blue arrow button.
The General settings allows you to decide the partition size. Check Activate the phone and Enabled baseband update. Click the blue arrow button.
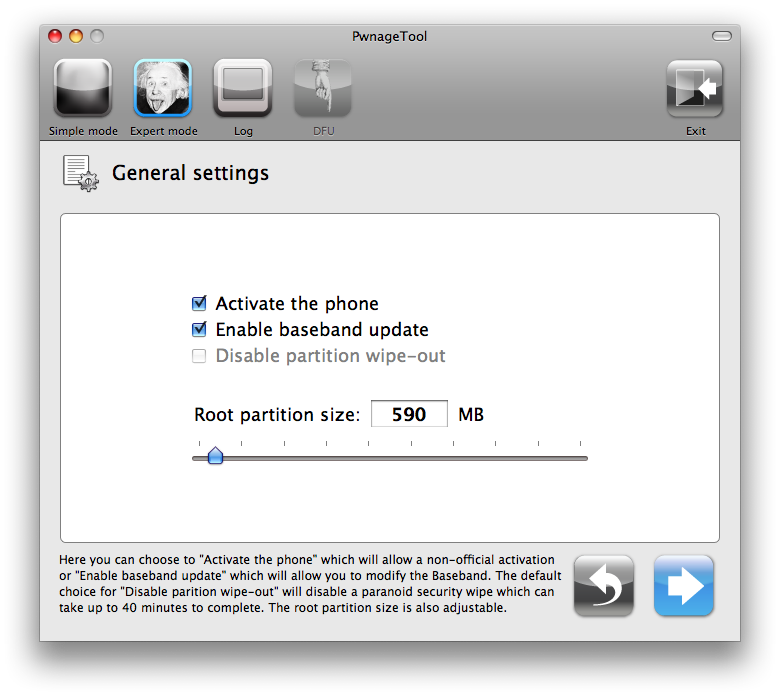
***If the Enable Baseband checkbox is not greyed out, checkmark it. This will allow the unlock to occur!***
***For the 3.0 firmware you may have to increase the size of your root partition slightly for the IPSW build to be successful. 590MB worked just fine for me***
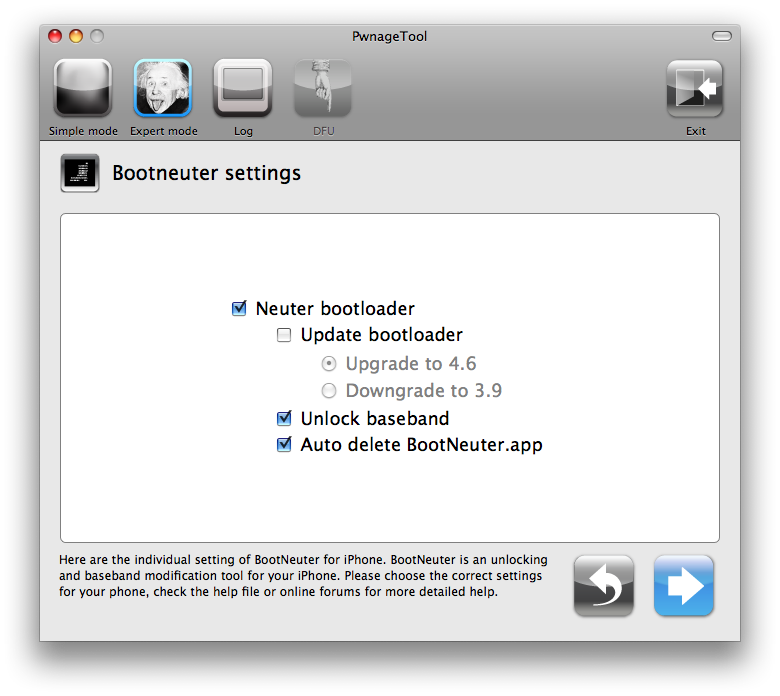
In the Bootneuter settings, click Neuter bootloader, Unlock baseband, and Auto-Delete BootNeuter.app. It is not necessary to upgrade the bootloader unless you are really feeling the need to be on 4.6. Click the blue arrow button to continue.
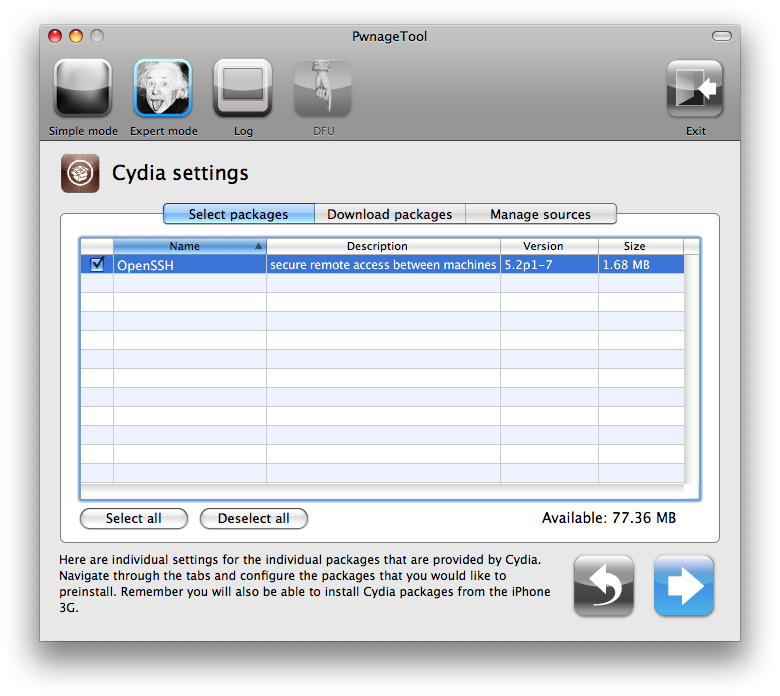
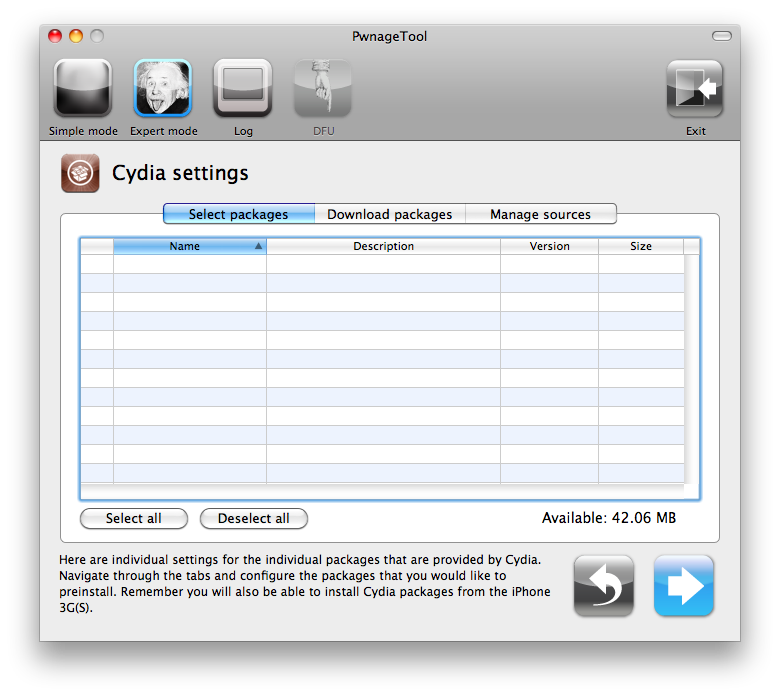
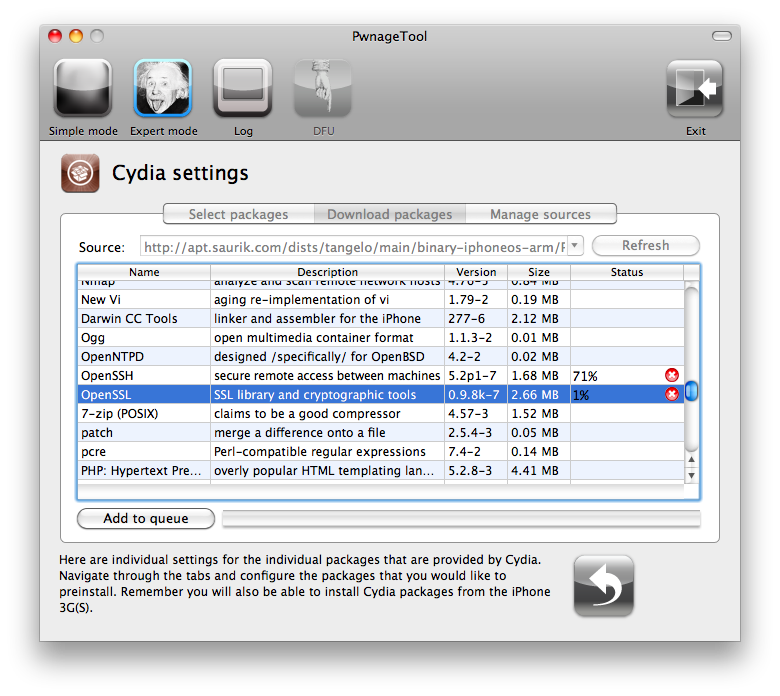
The Cydia settings menu allows you to create custom packages so you do not have to manually install the necessary them later.
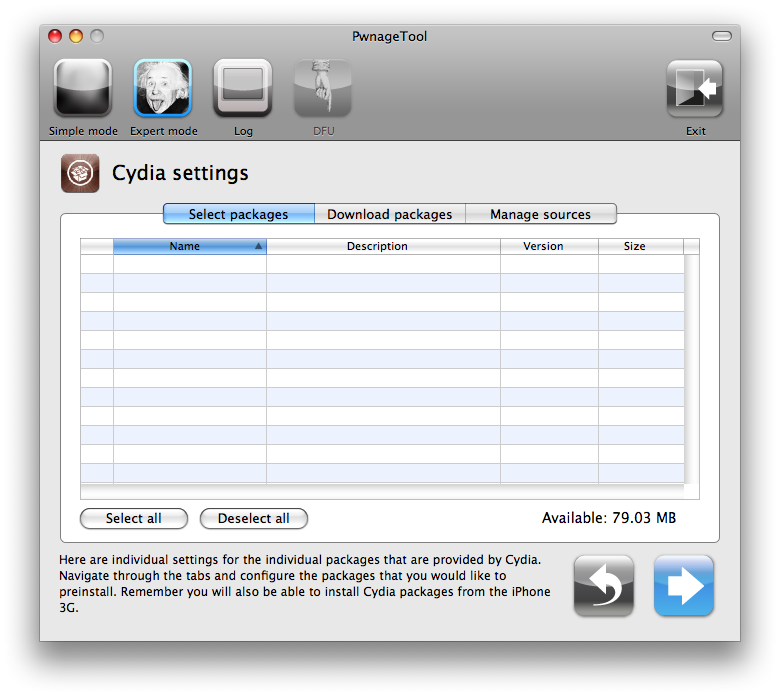
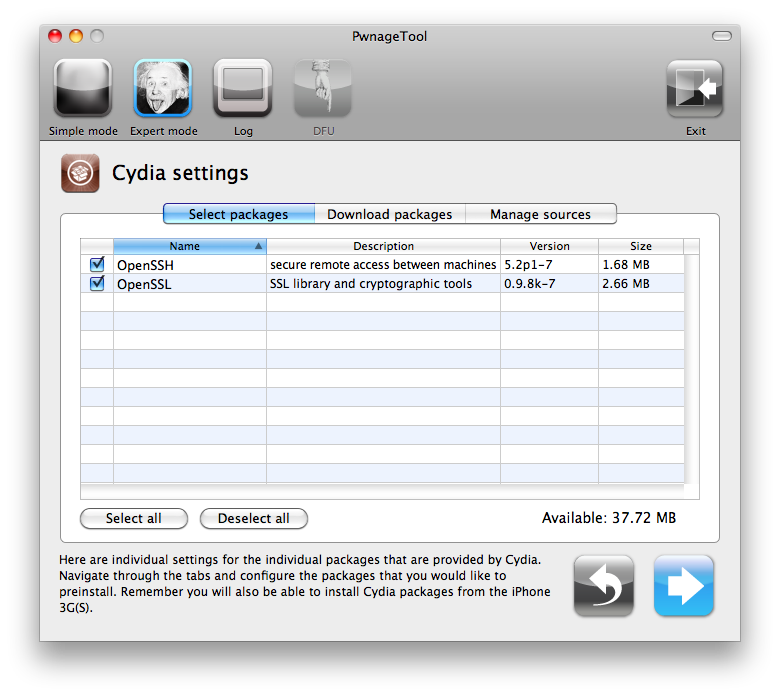
Click to select the Download packages tab. Then click the Refresh button to display all the available packages. Double clicking the package you want will download it and make it available in the Select Packages tab.
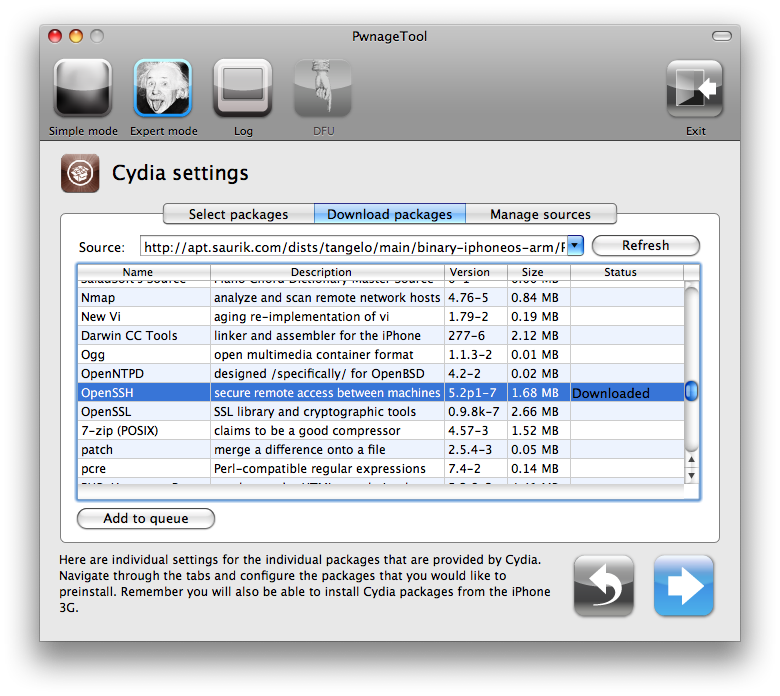
Checkmark the ones you want then Click the blue arrow button.
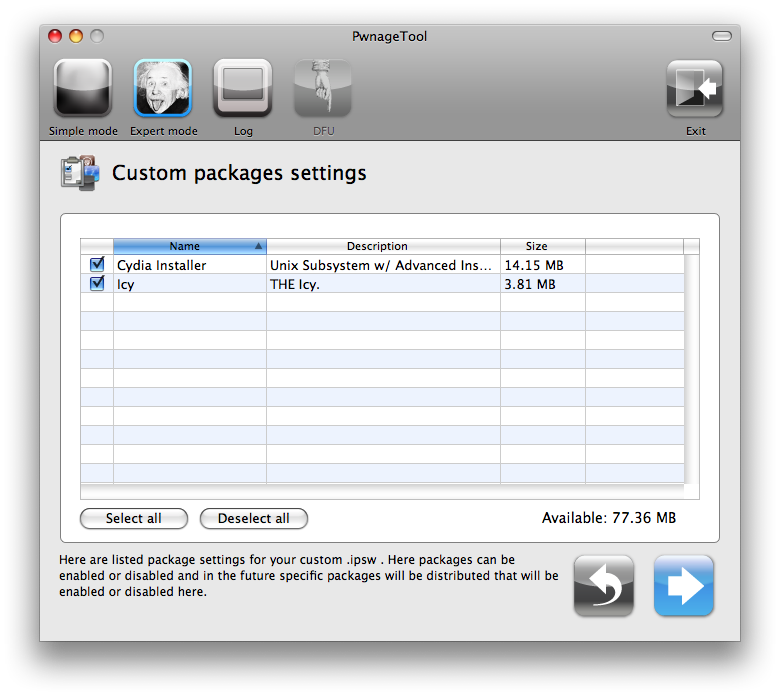
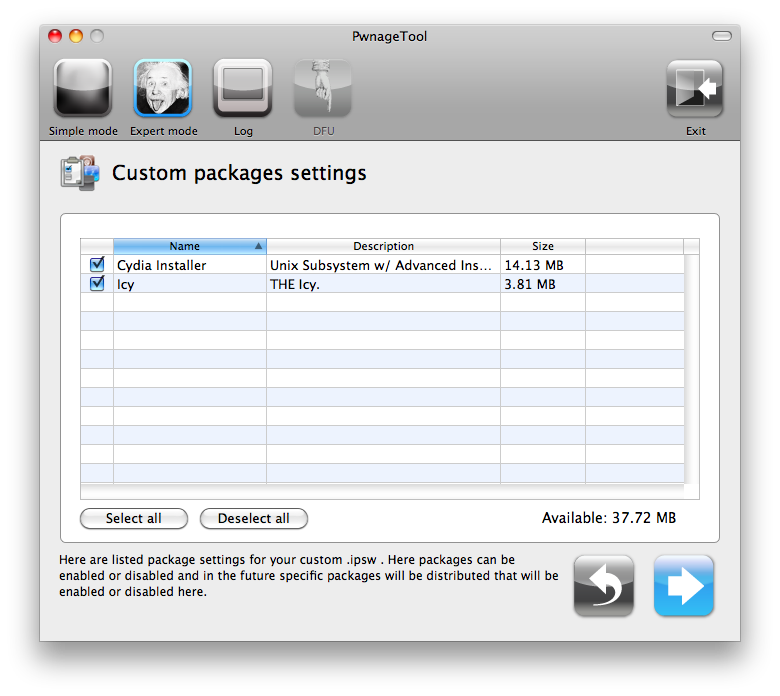
The Custom Packages Settings menu displays listed package settings for your custom IPSW. For know leave these settings as is. Click the blue arrow button to continue.
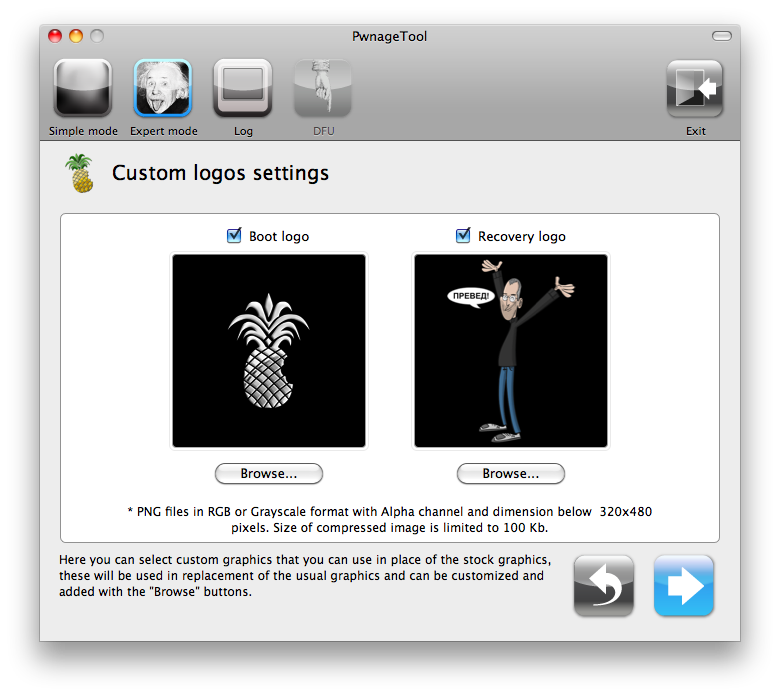
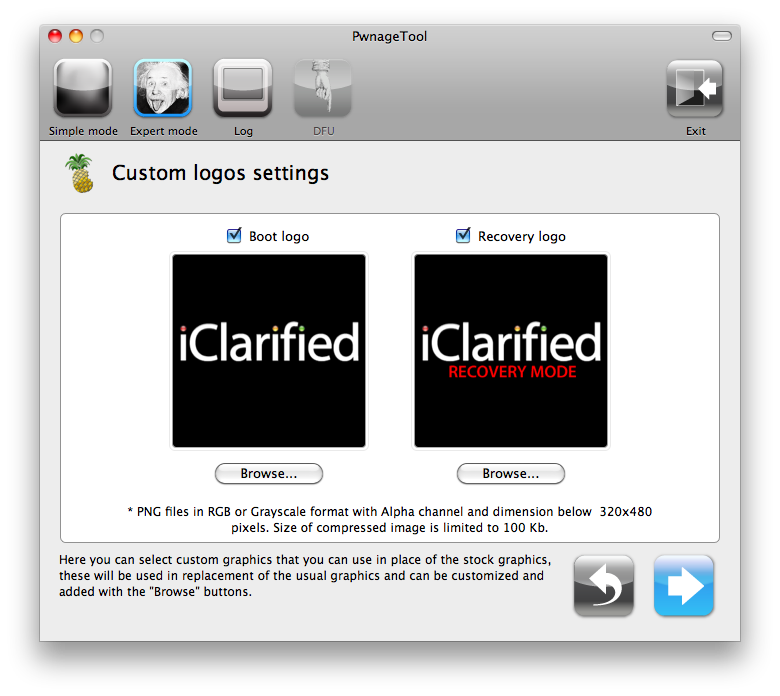
The Custom Logos Settings menu allows you to add your own images as boot logos. Click the Browse button to select your Boot logo and Recovery logo.
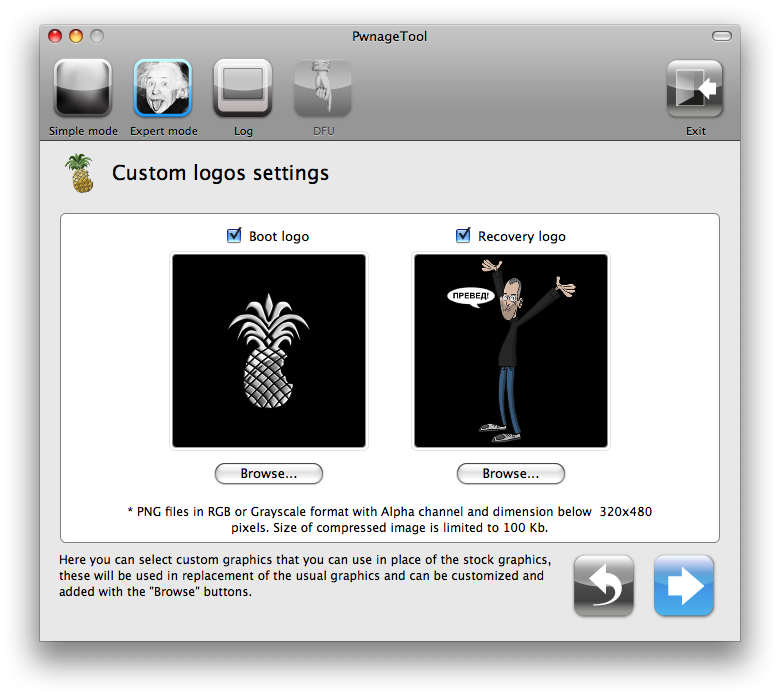
Remember the rules for them: RGB or Grayscale format with Alpha channel and dimension bellow 320×480. If you would like to use the iClarified ones they can be found here: Boot Logo, Recovery Logo
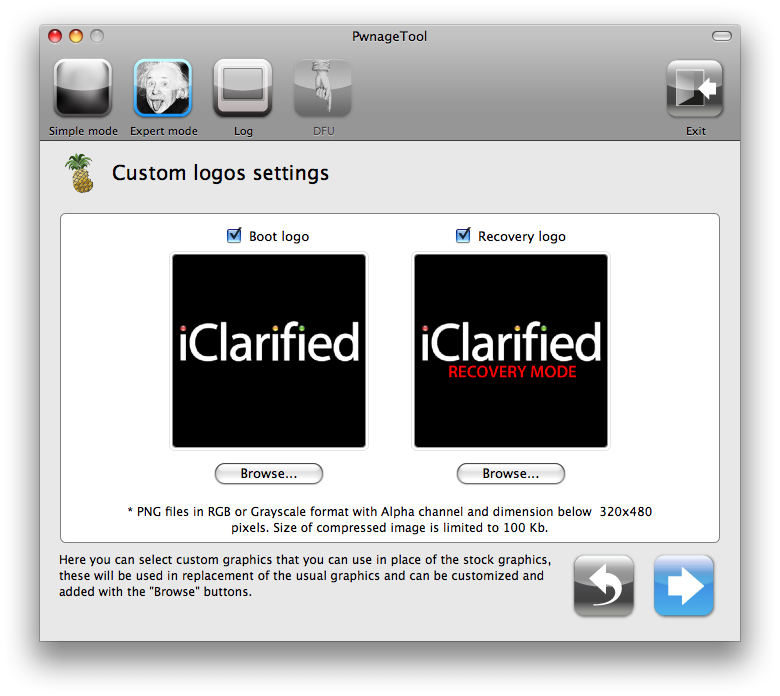
Click the blue arrow button to continue.
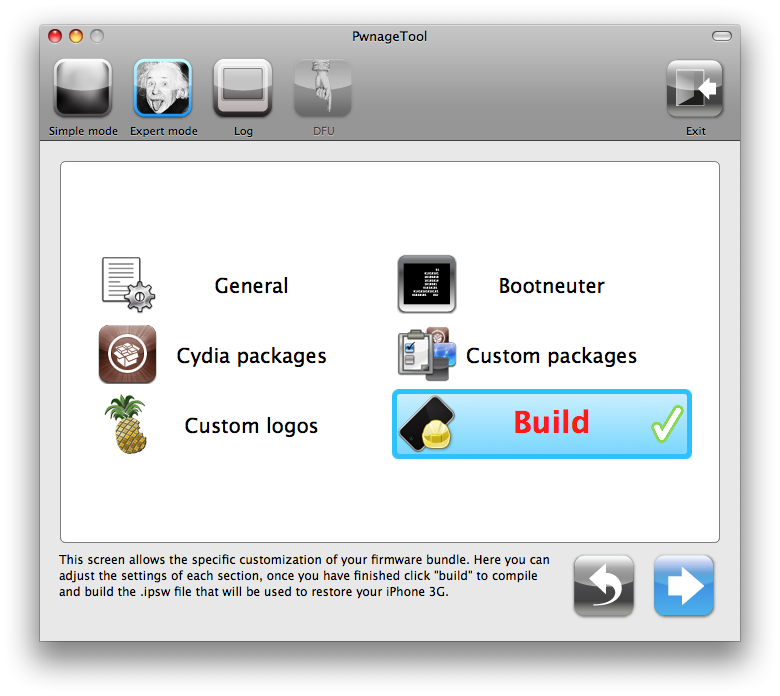
Step Seven
You are now ready to build your custom firmware. Click the build button to select it, then click the blue arrow button.
Step Eight
If this is the first time doing this, you will be asked to upload the 3.9 and 4.6 BL files. When prompted to search the web, click no.
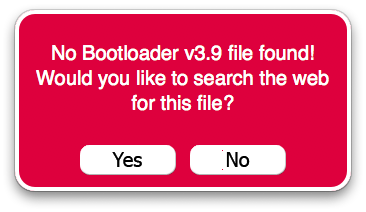
You will prompted to browse for the 3.9BL file. Click Yes then select the file(BL-39.bin) from the Pwnage folder you created on your desktop and click the Open button.
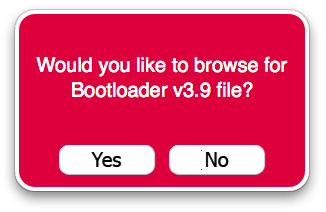
Select the file in the Pwnage folder on your desktop and click the Open button.
Do the same for 4.6.


***: After loading the 4.6 BL you may be asked if you’re a legit user. If you legally have ATT or an iPhone plan in a different country, clicking yes will not unlock the iPhone and activate it as your legal plan already activates it and there is no need for an unlock. However if you wish to keep the iPhone unlocked, when asked if you’re a legit iPhone user, click no
Step Nine
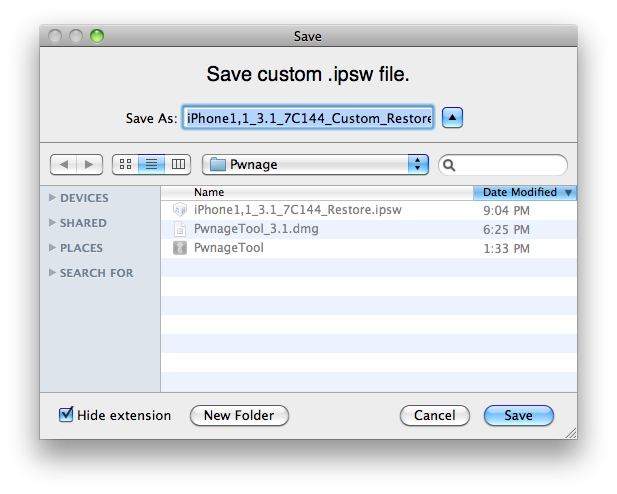
After both are found. You will be asked to save your custom .ipsw file. Save it to your Pwnage folder on the desktop.
Step Ten
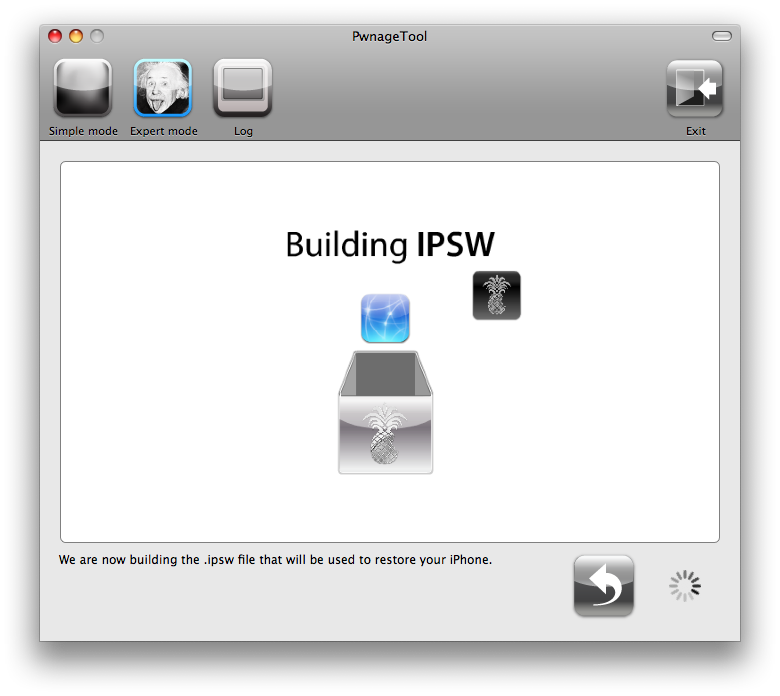
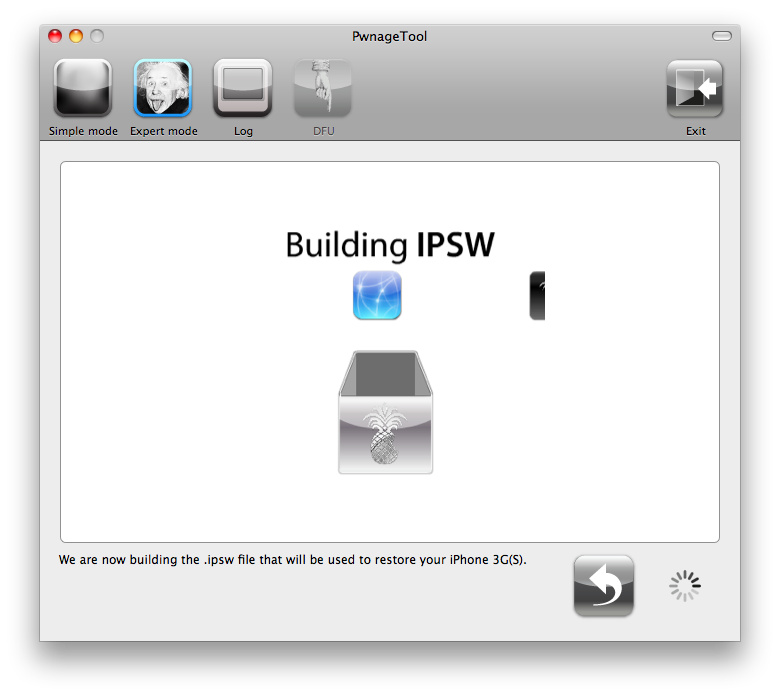
Your custom IPSW is now being built. Please allow up to 10 minutes.
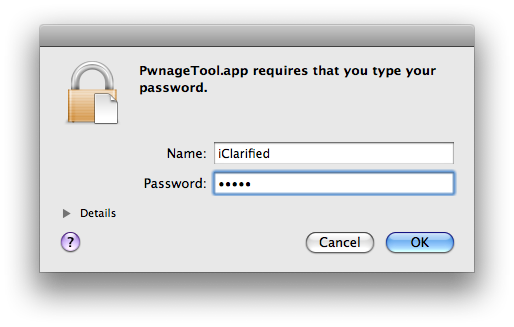
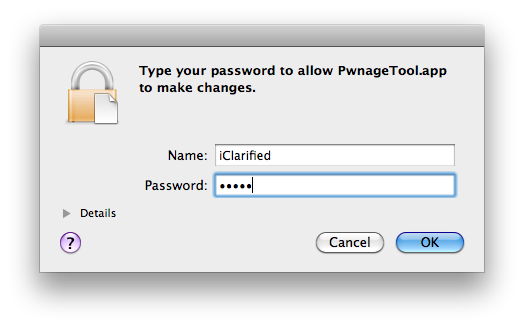
If prompted enter your Administrator password and click the OK button.
When prompted if your iPhone has been Pwned before, we clicked No. It allows for a more thorough restore.

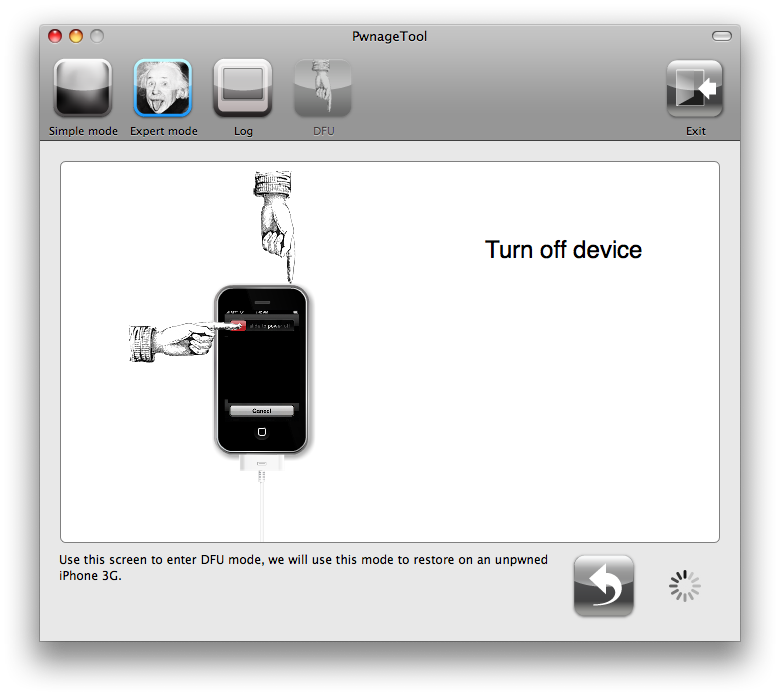
You will be asked to turn off the device. Make sure it is connected to the USB port.
Step Eleven
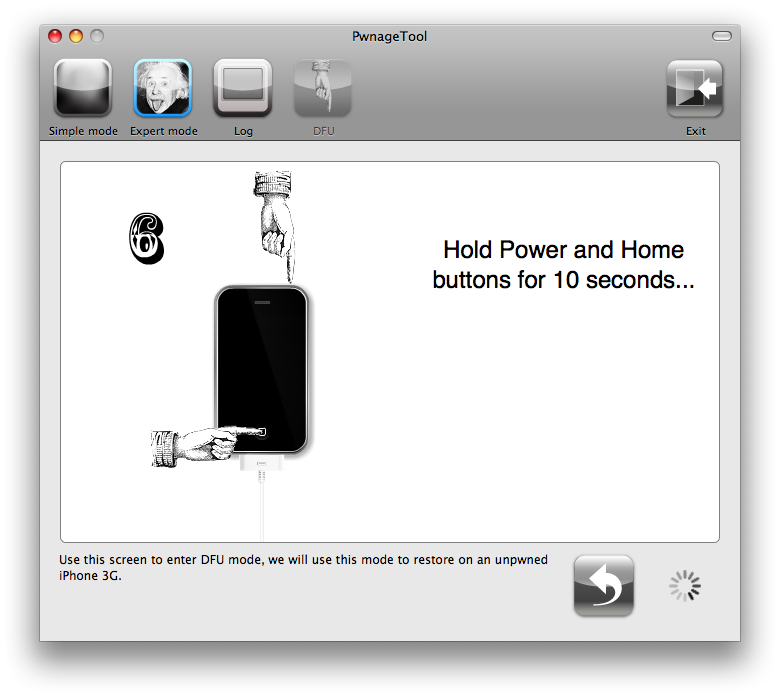
Be ready to follow directions now. It will ask you to hold the home button and the power button for 10 seconds. Then, you will have to release the power button and hold the home button for 10 seconds to enter DFU.

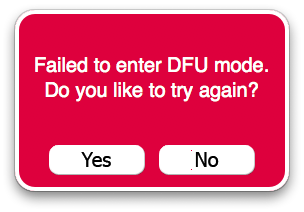
If you fail, it will show you a message. Click Yes. Unplug the iPhone from the USB. Turn it off, then turn it back on. Plug it back into the USB and turn off the iPhone when prompted.
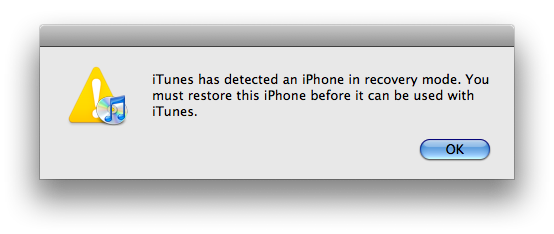
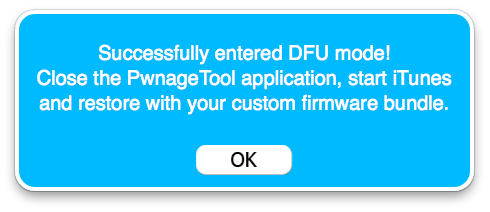
When done correctly, Pwnage 2.0 will display a message telling your that it successfully entered DFU mode. iTunes will also pop-up.

Step Twelve
In iTunes, hold the Alt/Option key and click Restore.
Step Thirteen
Navigate to the Pwnage folder on your desktop using the dialog window that appears. Select the custom IPSW that was created (iPhone1,1_3.1_7C144_Custom_Restore.ipsw) and click the Open button.

Step Fourteen
Once the restore has completed, it will restart your iPhone. The phone will then launch BootNeuter.app to unlock your device.
Please allow 5 minutes for this to complete. Your iPhone will restart once completed.
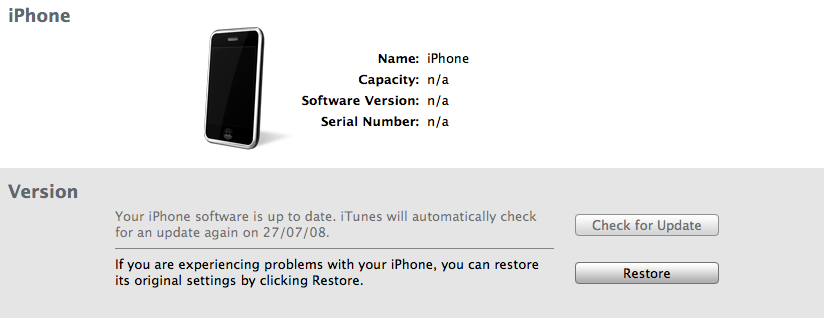
Saurik Creates Signature Server for iPhone 3GS Jailbreakers
Sep 15th
 Saurik has created a signature server to help iPhone 3GS jailbreakers circumvent the new downgrade restrictions.
With the iPhone 3GS, every time you restore the firmware iTunes contacts Apple to verify the restore. Apple can then choose to sign off on the restore or refuse it.
With the release of iPhone 3.1 Apple is now refusing to sign the 3.0 firmware. This means that you cannot downgrade.
So in order to bypass this restriction you need to save the verification information Apple sends back when doing a verified restore. After iTunes sends Apple your ECID (unique-chip-id), if verified the firmware file will be personalized, integrating the ECID, SHSH (signature hash), and CERT blocks into it.
Purplera1n.com was created to save a file that contained just the signature hash for the iBSS file, as that is “sufficient”; however, someone needs to write a tool to use this file.
Saurik’s solution saves the entire personalized firmware set required by iTunes to do a restore (full set of SHSH blobs) which will let you do a normal DFU restore in iTunes.
Unfortunately the ability to generate a full set of SHSH blobs via Cydia was only available for a very limited time. As soon as iPhone 3.1 was released Apple stopped signing the 3.0 firmware.
If you were one of the lucky ones and managed to have Cydia save your 3.0 or 3.0.1 ECID SHSHs then Saurik has created a server that duplicates the functionality exposed by Apple’s signature server. By changing your hosts file to include 74.208.105.171 gs.apple.com iTunes will now contact Cydia for authorization to restore.
You can find the hosts file here: C:\Windows\System32\drivers\etc\hosts (Windows) or /etc/hosts (Mac OS X).
For the majority of users who did not get their ECID SHSHs on file with Cydia for 3.0 there is still hope. Thegreenpois0n exploit should provide a jailbreak for the 3.1 firmware. At this point it is imperative that you have Cydia save your full set of SHSH blobs for future downgrading.
We will be posting tutorials on how to use these features once they become available.
Saurik’s writeup on this matter is far more detailed; however, we wanted to provide a simple overview of the situation. Use the link below to learn more…
Saurik has created a signature server to help iPhone 3GS jailbreakers circumvent the new downgrade restrictions.
With the iPhone 3GS, every time you restore the firmware iTunes contacts Apple to verify the restore. Apple can then choose to sign off on the restore or refuse it.
With the release of iPhone 3.1 Apple is now refusing to sign the 3.0 firmware. This means that you cannot downgrade.
So in order to bypass this restriction you need to save the verification information Apple sends back when doing a verified restore. After iTunes sends Apple your ECID (unique-chip-id), if verified the firmware file will be personalized, integrating the ECID, SHSH (signature hash), and CERT blocks into it.
Purplera1n.com was created to save a file that contained just the signature hash for the iBSS file, as that is “sufficient”; however, someone needs to write a tool to use this file.
Saurik’s solution saves the entire personalized firmware set required by iTunes to do a restore (full set of SHSH blobs) which will let you do a normal DFU restore in iTunes.
Unfortunately the ability to generate a full set of SHSH blobs via Cydia was only available for a very limited time. As soon as iPhone 3.1 was released Apple stopped signing the 3.0 firmware.
If you were one of the lucky ones and managed to have Cydia save your 3.0 or 3.0.1 ECID SHSHs then Saurik has created a server that duplicates the functionality exposed by Apple’s signature server. By changing your hosts file to include 74.208.105.171 gs.apple.com iTunes will now contact Cydia for authorization to restore.
You can find the hosts file here: C:\Windows\System32\drivers\etc\hosts (Windows) or /etc/hosts (Mac OS X).
For the majority of users who did not get their ECID SHSHs on file with Cydia for 3.0 there is still hope. Thegreenpois0n exploit should provide a jailbreak for the 3.1 firmware. At this point it is imperative that you have Cydia save your full set of SHSH blobs for future downgrading.
We will be posting tutorials on how to use these features once they become available.
Saurik’s writeup on this matter is far more detailed; however, we wanted to provide a simple overview of the situation. Use the link below to learn more…
How to Jailbreak Your iPhone 3G on OS 3.1 Using PwnageTool (Mac)
Sep 15th
This tutorial will show you how to jailbreak your 3G iPhone by creating a custom ipsw that can automatically jailbreak, install applications, and add your own boot logos. To learn how to use PwnageTool to unlock/jailbreak a 2G iPhone you can use the tutorial which is
Step One You will also need the 3.1 iPhone firmware. When downloading the IPSW file, it is best to download it with Firefox since Safari often auto extracts it! Step Two Then from the Pwnage folder double click to launch the PwnageTool application. Click Ok if presented with a warning. Step Three Step Four Step Five Click to select the found IPSW file, a checkmark will appear next to it. Then click the blue arrow button to continue. Step Six The General settings allows you to decide the partition size. Check Activate the phone if you are not with an official carrier then click the blue arrow button. NOTE*: Deselect Activate if you have an iPhone legitimately activated on an official carrier. The Bootneuter settings are greyed out for the 3G iPhone. Click the blue arrow button. The Cydia settings menu allows you to create custom packages so you do not have to manually install the necessary them later. Click to select the Download packages tab. Then click the Refresh button to display all the available packages. Double clicking the package you want will download it and make it available in the Select Packages tab. Checkmark the ones you want then Click the blue arrow button. The Custom Packages Settings menu displays listed package settings for your custom IPSW. For know leave these settings as is. Click the blue arrow button to continue. The Custom Logos Settings menu allows you to add your own images as boot logos. Click the Browse button to select your Boot logo and Recovery logo. If you would like to use the iClarified ones they can be found here:Boot Logo, Recovery Logo Remember the rules for them: RGB or Grayscale format with Alpha channel and dimension bellow 320×480… Click the blue arrow button to continue. Step Seven Step Eight Your IPSW is not being built. Please allow up to 10 minutes. You will be asked to enter your administrator password. Do this then click the OK button. When prompted if your iPhone has been Pwned before, we clicked No. It allows for a more thorough restore. You will be asked to turn off the device. Make sure it is connected to the USB port. Step Nine If you fail, it will show you a message. Click Yes. Unplug the iPhone from the USB. Turn it off, then turn it back on. Plug it back into the USB and turn off the iPhone when prompted. When done correctly, PwnageTool will display a message telling your that it successfully entered DFU mode. iTunes will also pop-up. Step Ten Step Eleven Step Twelve If you so desire you may restore from a previous backup to keep all your settings or set your iPhone up fresh. Step Thirteen
 Watch the Video!
For your convenience this tutorial is available in video format also. Click the Watch It button to view the tutorial!
Make a folder called “Pwnage” on the desktop. In it, you will need a couple of things. PwnageTool 3.1, found here or here
3.1.0 (3G): iPhone1,2_3.1_7C144_Restore.ipsw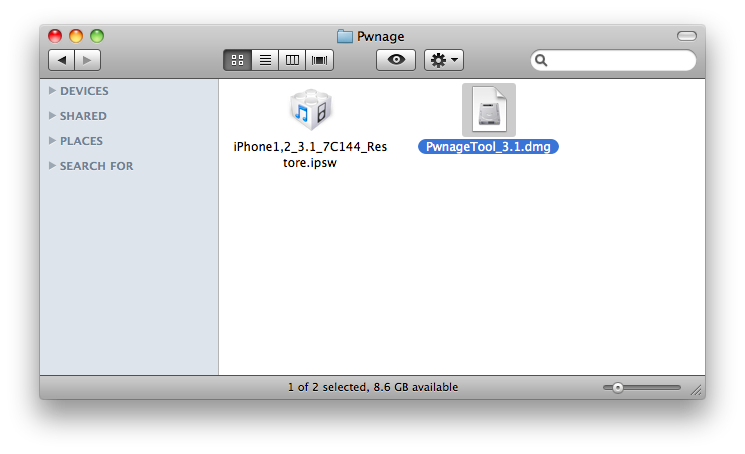
Double click to mount PwnageTool 3.1 then drag the PwnageTool icon into the Pwnage folder.
Click to select Expert Mode from the top menu bar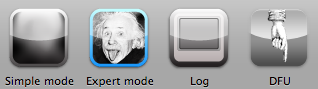
Click to select your iPhone. A check-mark will appear over the image of the phone.
Click the blue arrow button to continue. You will be brought to the “Browse for IPSW” page. On my laptop, it automatically found the IPSW. If PwnageTool doesn’t automatically find the ipsw file you can click Browse for IPSW….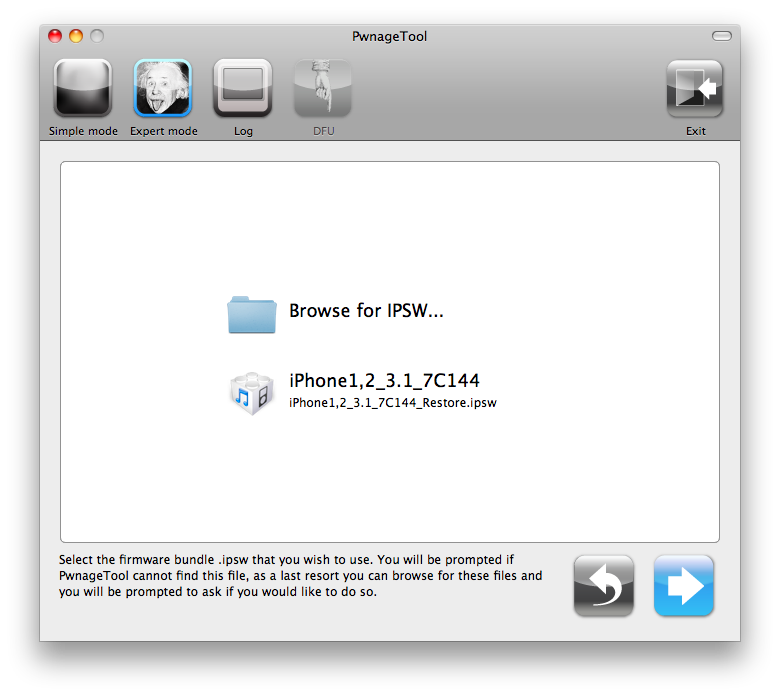

You will then be brought to a menu with 7 choices. Click to select General then click the blue arrow button.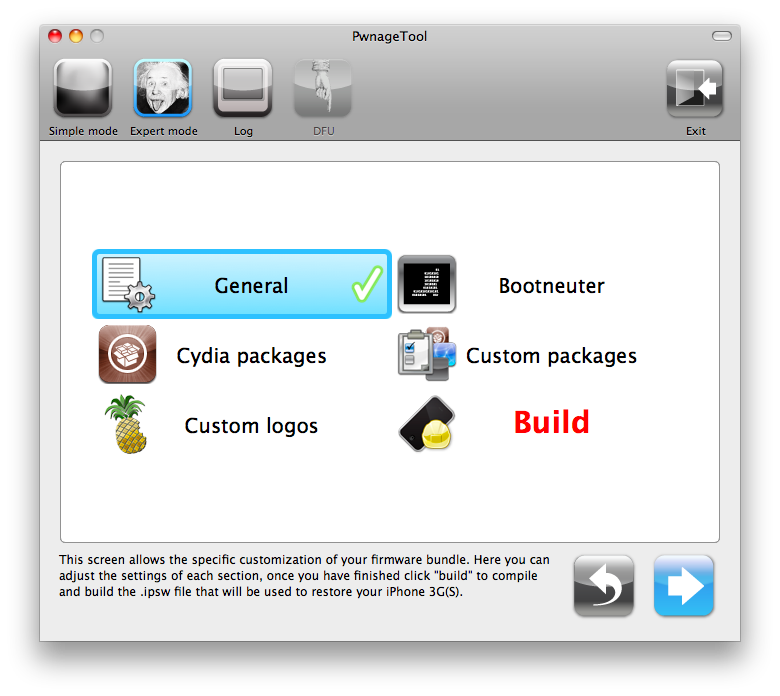

NOTE*: You may need to increase the size of the root partition slightly. My first attempt failed at creating the IPSW until I increased the size to about 695 MB.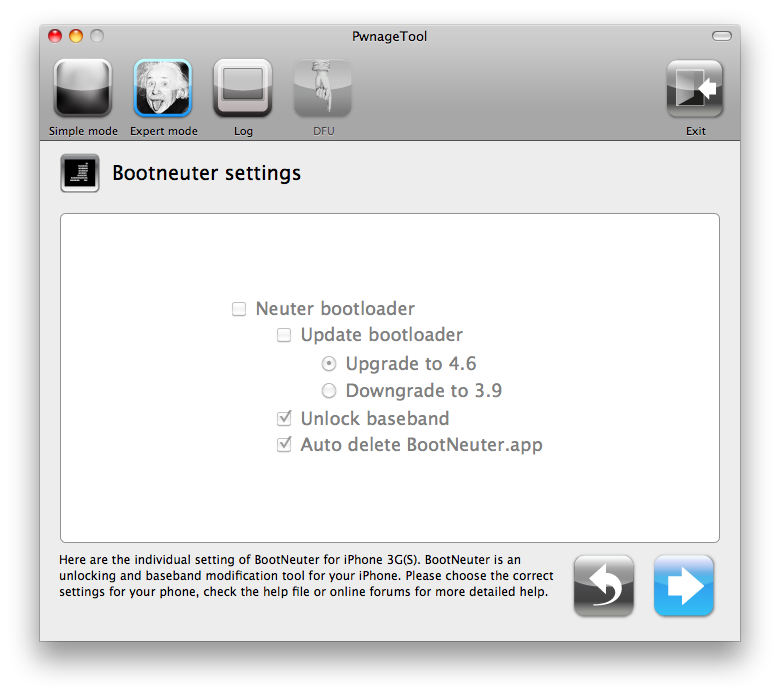
You are now ready to begin the pwnage process! Click the Build button to select it then click the Blue arrow button to begin.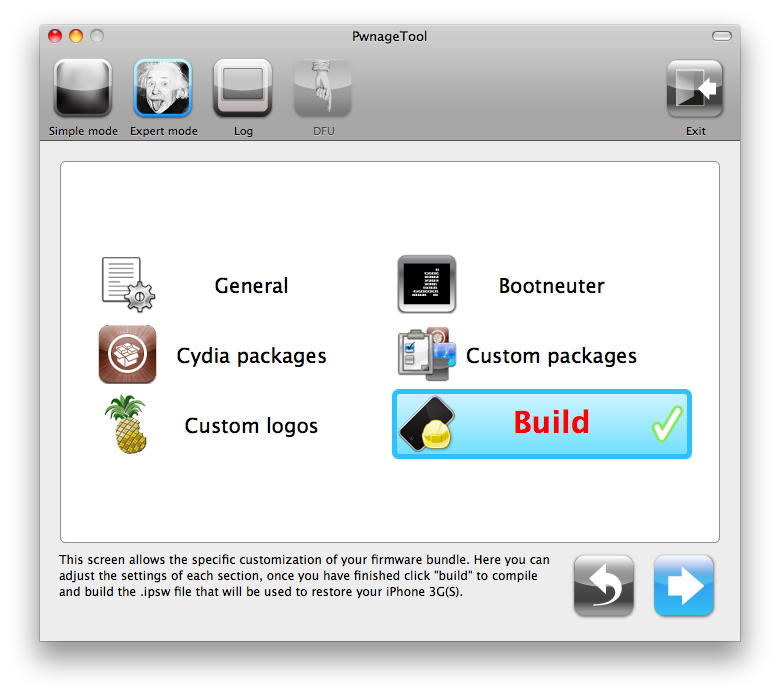
You will be asked to save your custom .ipsw file. Save it to your Pwnage folder you created on your Desktop.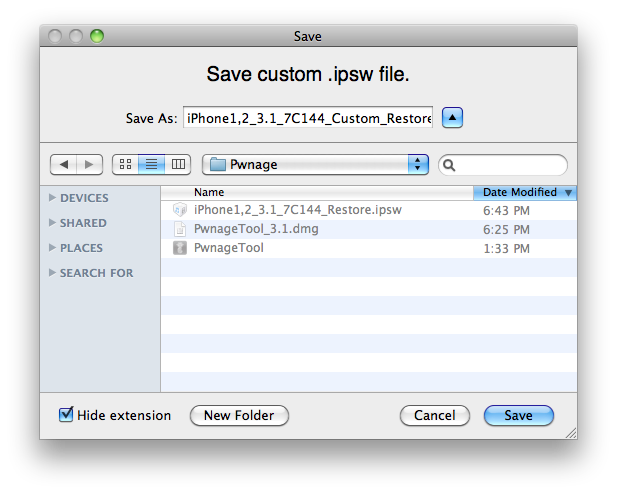


Be ready to follow directions now. It will ask you to hold the home button and the power button for 10 seconds. Then, you will have to release the power button and hold the home button for 10 seconds to enter DFU.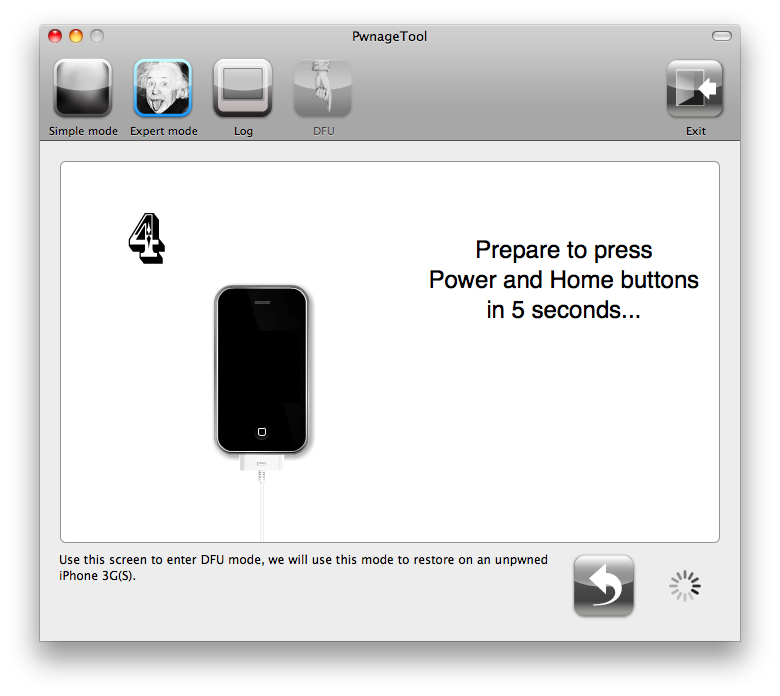

In iTunes, hold the Alt/Option key and click Restore.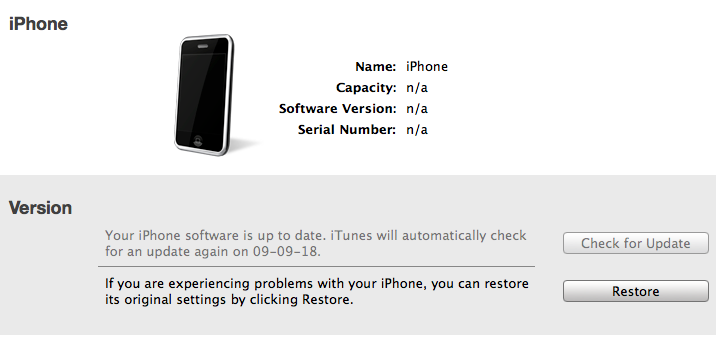
Navigate to the Pwnage folder on your desktop using the dialog window that appears. Select the custom IPSW that was created (iPhone1,2_3.1_7C144_Custom_Restore.ipsw) and click the Open button.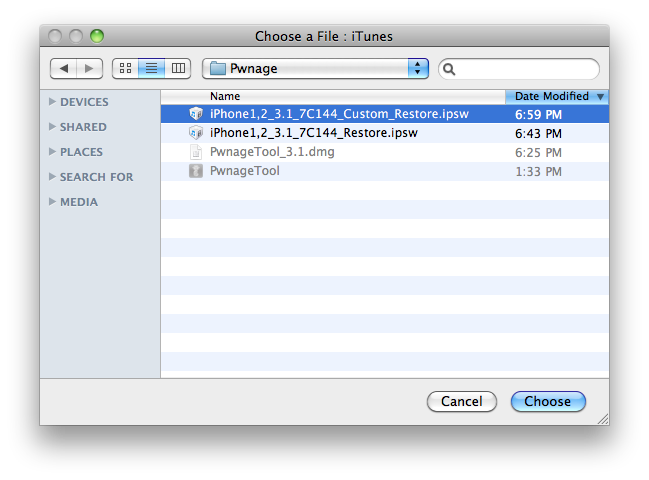
iTunes will now restore the firmware on your iPhone. This can also take up to 10 minutes.

Once the restore is completed your iPhone will reboot and you will notice Cydia is present on the SpringBoard!
How to Unlock/Jailbreak Your iPhone 2G on OS 3.1 Using PwnageTool (Mac)
Sep 15th
This tutorial will show you how to jailbreak and unlock your 2G iPhone on the 3.1 iPhone firmware.
Unfortunately PwnageTool is not available for Windows yet.
Watch the Video!
For your convenience this tutorial is available in video format also. Click the Watch It button to view the tutorial!
Alright, first make a folder on the desktop. In it, you will need a couple of things. The two bootloader files:
- BL 3.9
- BL 4.6
You will also need the 3.1 iPhone firmware.
3.1.0 (2G): iPhone1,1_3.1_7C144_Restore.ipsw
When downloading the IPSW file, it is best to download it with Firefox!
Step One
Create a folder on your desktop with all the required files listed above.
Step Two
Double click to mount the PwnageTool dmg.
Drag the PwnageTool icon to the Pwnage folder then launch it.
Click Ok if presented with a warning.
Step Three
Make sure you click Expert Mode from the top menu.
Step Four
Select your iPhone or iPod from the three devices shown. Notice a large checkmark appears over the selected device. Then click the blue arrow button at the bottom right.
Step Five
You will be brought to the “Browse for IPSW” page. On my laptop, it automatically found the IPSW. If PwnageTool doesn’t automatically find the ipsw file you can click Browse for IPSW… button.
Click to select the found IPSW file, a checkmark will appear next to it. Then click the blue arrow button to continue.
Step Six
You will then be brought to a menu with 7 choices. Click to select General then click the blue arrow button.
The General settings allows you to decide the partition size. Check Activate the phone and Enabled baseband update. Click the blue arrow button.
***If the Enable Baseband checkbox is not greyed out, checkmark it. This will allow the unlock to occur!***
***For the 3.0 firmware you may have to increase the size of your root partition slightly for the IPSW build to be successful. 590MB worked just fine for me***
In the Bootneuter settings, click Neuter bootloader, Unlock baseband, and Auto-Delete BootNeuter.app. It is not necessary to upgrade the bootloader unless you are really feeling the need to be on 4.6. Click the blue arrow button to continue.
The Cydia settings menu allows you to create custom packages so you do not have to manually install the necessary them later.
Click to select the Download packages tab. Then click the Refresh button to display all the available packages. Double clicking the package you want will download it and make it available in the Select Packages tab.
Checkmark the ones you want then Click the blue arrow button.
The Custom Packages Settings menu displays listed package settings for your custom IPSW. For know leave these settings as is. Click the blue arrow button to continue.
The Custom Logos Settings menu allows you to add your own images as boot logos. Click the Browse button to select your Boot logo and Recovery logo.
Remember the rules for them: RGB or Grayscale format with Alpha channel and dimension bellow 320×480. If you would like to use the iClarified ones they can be found here: Boot Logo, Recovery Logo
Click the blue arrow button to continue.
Step Seven
You are now ready to build your custom firmware. Click the build button to select it, then click the blue arrow button.
Step Eight
If this is the first time doing this, you will be asked to upload the 3.9 and 4.6 BL files. When prompted to search the web, click no.
You will prompted to browse for the 3.9BL file. Click Yes then select the file(BL-39.bin) from the Pwnage folder you created on your desktop and click the Open button.
Select the file in the Pwnage folder on your desktop and click the Open button.
Do the same for 4.6.
***: After loading the 4.6 BL you may be asked if you’re a legit user. If you legally have ATT or an iPhone plan in a different country, clicking yes will not unlock the iPhone and activate it as your legal plan already activates it and there is no need for an unlock. However if you wish to keep the iPhone unlocked, when asked if you’re a legit iPhone user, click no
Step Nine
After both are found. You will be asked to save your custom .ipsw file. Save it to your Pwnage folder on the desktop.
Step Ten
Your custom IPSW is now being built. Please allow up to 10 minutes.
If prompted enter your Administrator password and click the OK button.
When prompted if your iPhone has been Pwned before, we clicked No. It allows for a more thorough restore.
You will be asked to turn off the device. Make sure it is connected to the USB port.
Step Eleven
Be ready to follow directions now. It will ask you to hold the home button and the power button for 10 seconds. Then, you will have to release the power button and hold the home button for 10 seconds to enter DFU.
If you fail, it will show you a message. Click Yes. Unplug the iPhone from the USB. Turn it off, then turn it back on. Plug it back into the USB and turn off the iPhone when prompted.
When done correctly, Pwnage 2.0 will display a message telling your that it successfully entered DFU mode. iTunes will also pop-up.
Step Twelve
In iTunes, hold the Alt/Option key and click Restore.
Step Thirteen
Navigate to the Pwnage folder on your desktop using the dialog window that appears. Select the custom IPSW that was created (iPhone1,1_3.1_7C144_Custom_Restore.ipsw) and click the Open button.
Step Fourteen
Once the restore has completed, it will restart your iPhone. The phone will then launch BootNeuter.app to unlock your device.
Please allow 5 minutes for this to complete. Your iPhone will restart once completed.
Set a Passcode Lock with Find My iPhone
Sep 10th

Apple has announced that you can now set a passcode lock on your iPhone remotely using Find My iPhone.
—
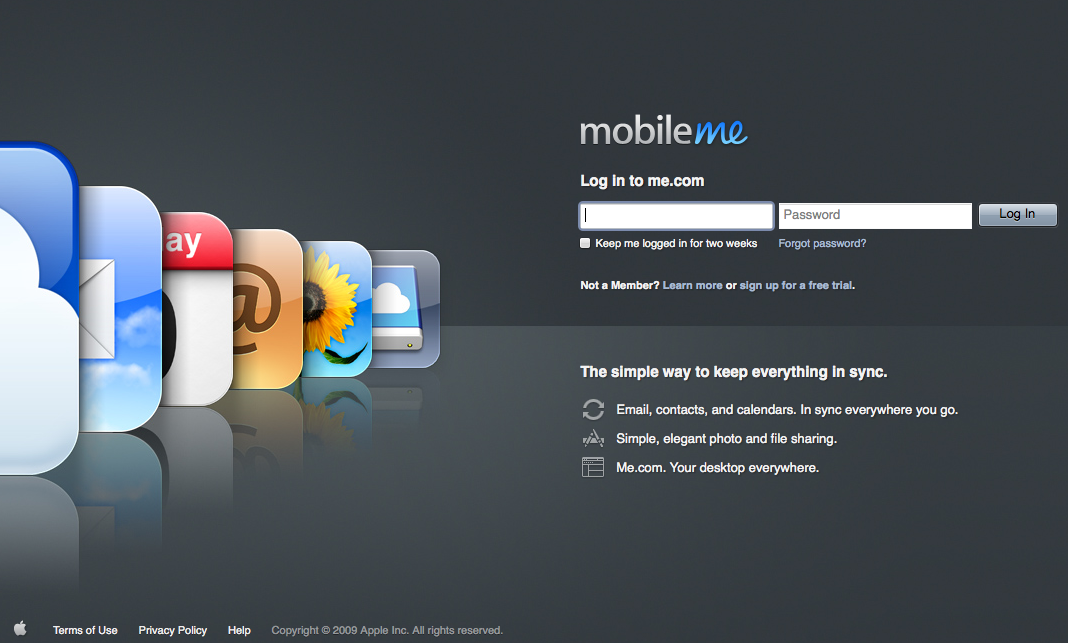
With Find My iPhone, you can help protect the information on a missing iPhone by remotely assigning a four-digit passcode lock. This is especially useful if you’ve never set a passcode before or if you want to set a new one.
To use this new feature, first install the iPhone OS 3.1 Software Update. Then if you want to remotely set a passcode lock, log in to your MobileMe Account, choose Find My iPhone in the column on the left, and click Remote Lock.
—

MobileMe Control Panel for Windows
Sep 10th

Apple has announced a new version of the MobileMe Control Panel for Windows.
With the new version 1.5 you can assign your primary MobileMe calendar to sync with the default calendar in Microsoft Outlook. Any other MobileMe calendars you have will continue to sync with Outlook and appear as separate calendars. The new control panel also delivers improvements for syncing bookmarks between Internet Explorer and Safari, and provides compatibility with Windows 7.
If you are already using the MobileMe Control Panel, you can simply upgrade to iTunes 9. This will update the control panel automatically. If you are installing for the first time, Apple has provided instructions here.
Apple Blocks 3GS Downgrades, iTunes 9 is Safe, 3.1GM Vulnerable
Sep 10th

Since the release of iTunes 9 and the iPhone OS 3.1 yesterday the Dev Teams have been busy analyzing the software to find changes.
Here is the current status…
- MuscleNerd confirms that it is safe to update to iTunes 9 for those who have already jailbroken/unlocked.
- saurik has noted that Apple has blocked the downgrade to 3.0 for iPhone 3GS users. This means that he can no longer signature hashes for users. Users who have saved their ECID SHSH information will have to wait for someone to build something to use that information. We will post more explaining this in the near future. In the meanwhile you may want to look at this (Windows, Mac) tutorial.
- chronicdev has confirmed that the iPhone 3.1GM is still vulnerable
- the new firmware does include a baseband upgrade which will cause you to lose your unlock unless you are on the iPhone 2G or have an iPhone 3G with the 5.8 bootloader. If you do have the 5.8 bootloader please note that no tools are available to perform the baseband downgrade yet.
- it is NOT okay to update to 3.1 if you are jailbroken or might want to jailbreak in the near future. WAIT!


Recent Comments